Behind the facade of Git and its counterparts — Part I
Sat Feb 21 2026
Most people are unaware of git's capabilities, and are
unable to grasp the value of such software.
If you are just getting started with git, you probably see no
difference between committing your changes and uploading files to Google
Drive. You call git add, git commit, git push, as you were
understandably taught, and call it a day. Maybe you've run into a merge
conflict once or twice and panicked before googling your way out of it.
That's fine. It's not a crime to use the above commands. In your everyday life, you will use these commands often. Much like driving a car without understanding how the engine works, you may "drive" git without understanding its internals. Until that car breaks down...
You panic. You anxiously decide to steer the car off to the side of the road with all the momentum it has remaining so that you don't cause a traffic jam. You pull the latch to unlock the hood of your vehicle and step outside. You lift up the hood and the realization hits you: you have no idea what you're looking at.
Feeling defeated (and frankly useless), you grab your phone and decide to call your insurance company's roadside assistance service number. They are able to help you. You are lucky that this time there wasn't an accident caused by this commotion.
The same concept applies to git. Only this time, you would have a
git project to fix. Should there be any issues, your fellow
software engineers are not interested in fixing it for you, but would be more
than happy to provide you with the resources on how to fix it yourself.
Now imagine you had a good idea on how car engines work. Sure, you would still call for assistance in case of a major malfunction, but chances are that you would be able to fix it yourself and just go on about your day, wasting minimal time and most importantly, remaining calm.
You would have trust in yourself. You would feel free to experiment and
modify your car in ways that get you closer to your goals. You would feel
independent, capable and useful for being able to troubleshoot issues when
your vehicle breaks down, and git is going to be a "vehicle"
you are going to drive a lot throughout your software development career.


This post isn't about making you a git expert. It's about showing you what's actually happening when you run those commands you've probably memorized. Even if you are a beginner, feel absolutely free to continue reading. The approach we take in this post is that we begin learning about git straight from the core. Let's get started.
Prerequisites
Knowing the basics of any programming language is more than enough to read this article. It is implied that you already have git installed on your machine, so details on its installation will not be included.
And git said, let there be light...

Sometimes it makes sense to strengthen your fundamental concepts, and then start introducing the more advanced ones.
The basic component of git — object
Git, in essence, is a database of objects. That is all it does at the core. You might be familiar with the term "repository". A repository is a "container" or a database, if you will.
I challenge you to make a new folder, set your working directory to it, then call:
All this does simply is it creates a new hidden
folder called .git.
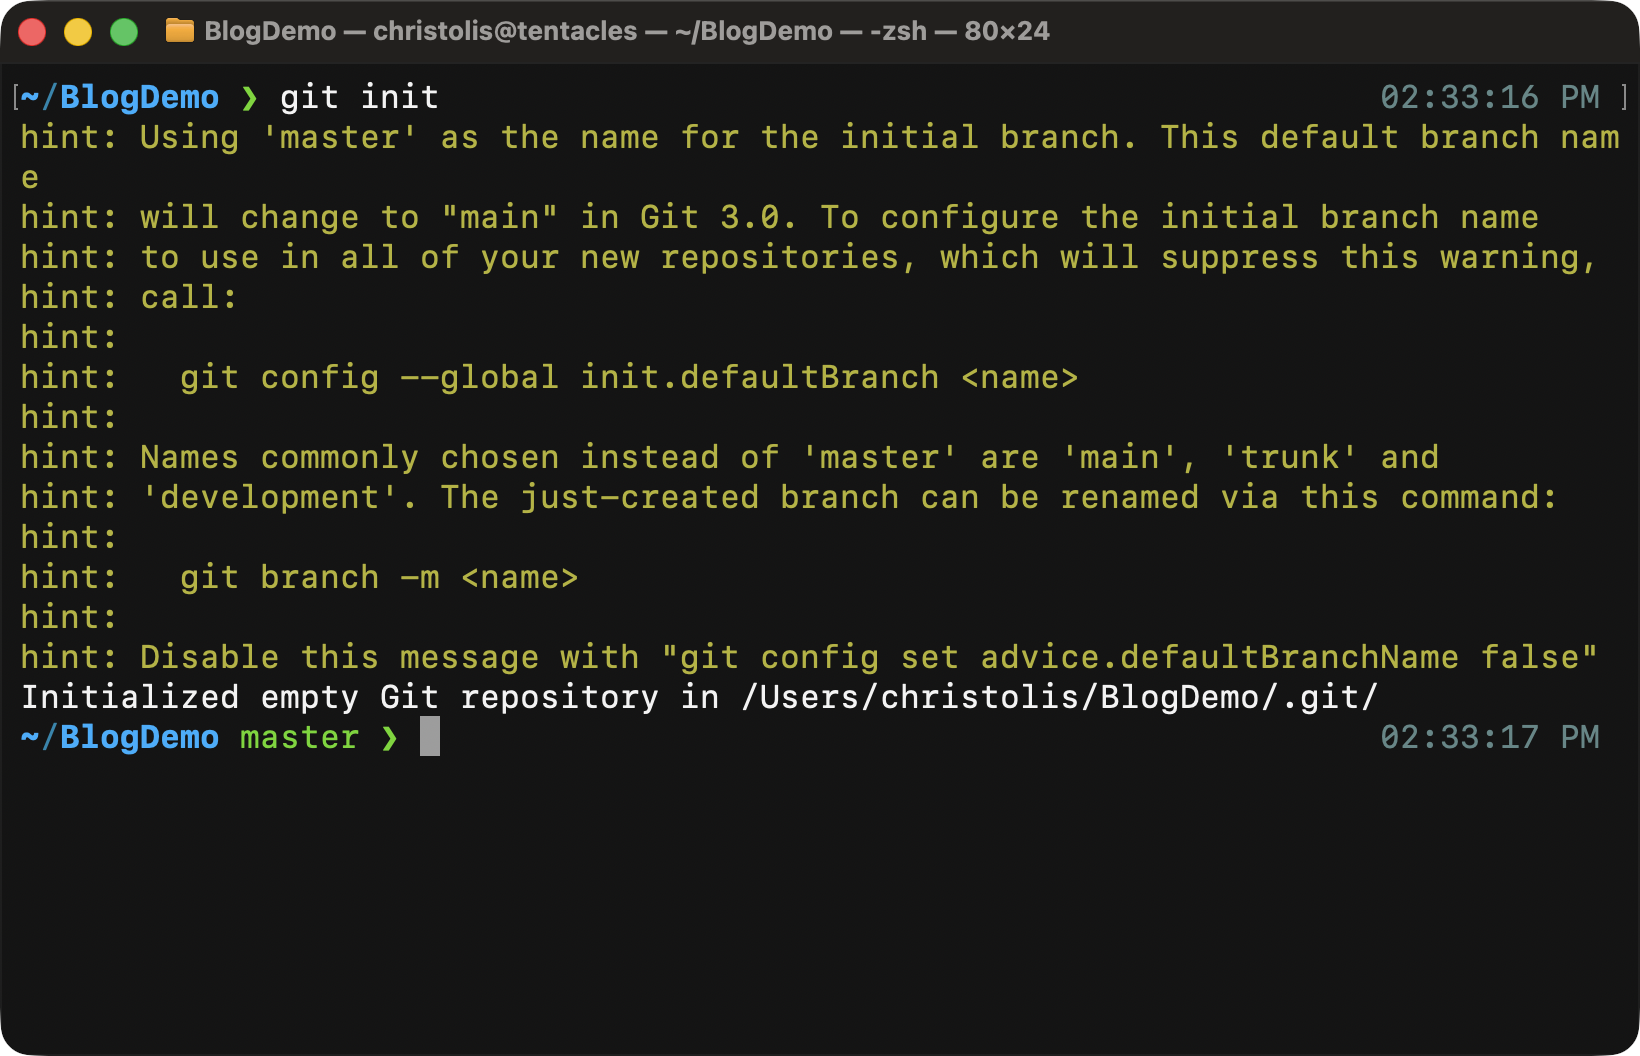
You might get a warning like this, don't worry too much about it for now.
Notice that git is informing us on where it made the .git/ directory and
in our case it's right inside the working directory that we are on. This
is important to note since by default, git does not make a directory for
you, you have to make it yourself and be inside of it when you call this
command!
The .git/ directory is where all the magic happens. Delete this directory,
and you have essentially deleted all data that git has stored for your project.
But let's not get too ahead of ourselves, let's delve into this hidden folder
and check out its contents.
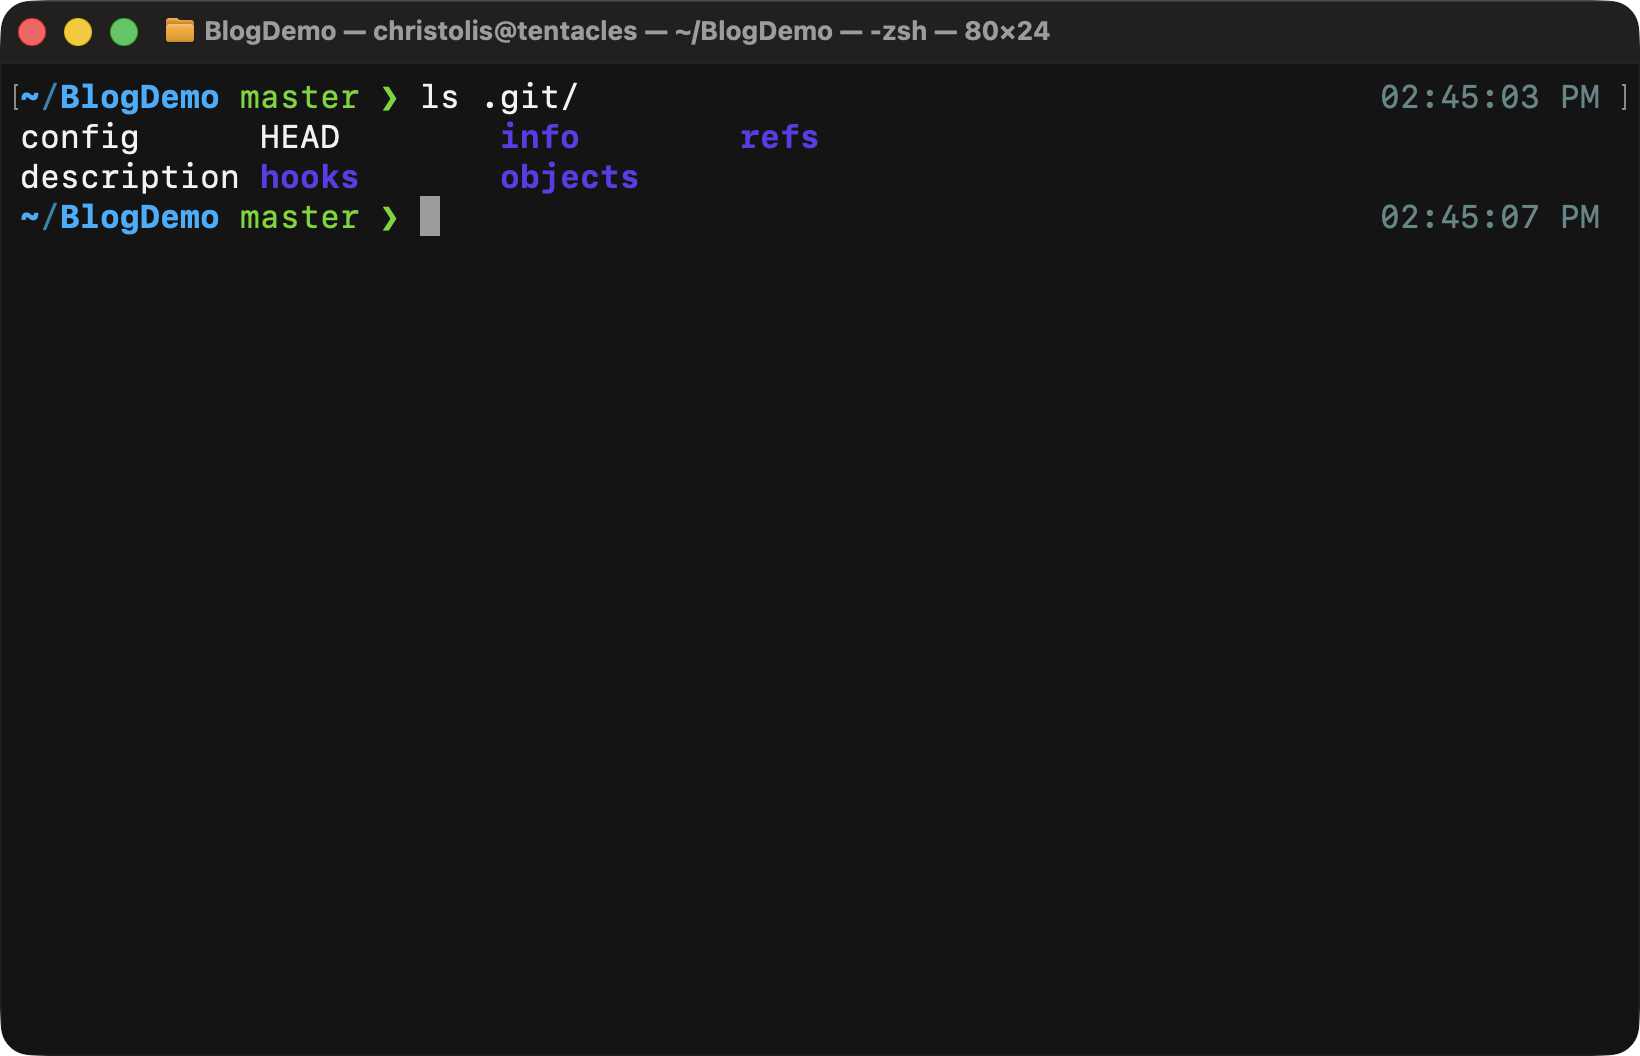
The contents of the .git/ directory.
Already from this view, we can observe that git has created an objects/
directory, along with a few others that we will discuss as we go. The
objects/ directory is, as the name implies, where every object will be
stored. It does not matter what kind of object it is, if it is considered an
object in the git world, chances are you will find it here. Therefore, have
that in mind for any future experiments you will be having.
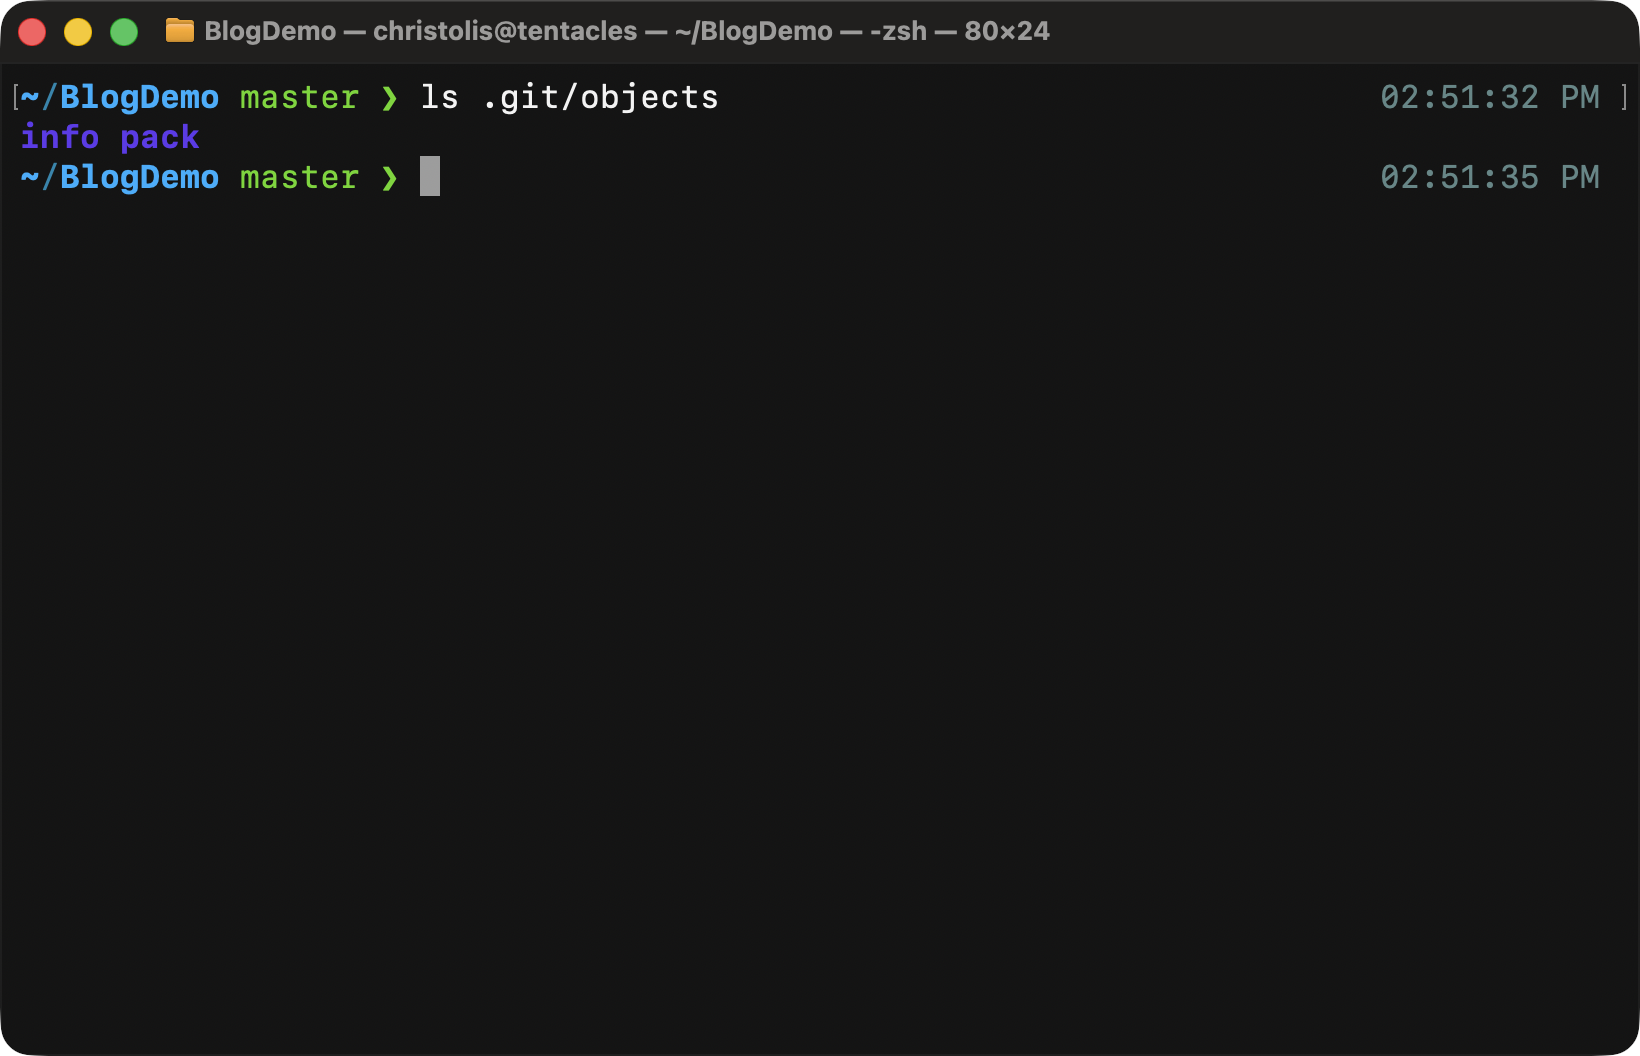
The contents of the .git/objects directory.
Checking the contents of the objects/ directory gives us some rather
interesting results. We can see two subdirectories: one called info/ and
another called pack/. I am not going to explain those directories in this
article since they won't really help you understand the bigger picture. I'd
urge you to read Linux Torvald's doc "Concerning
Git's Packing Heuristics" for a thorough and technical explanation.
Since we currently have no objects in our repository (a.k.a database), these are all the files and directories we get to see.
A quick primer on hashing
Feel free to skip this section if you are well-versed with hashing functions.
Imagine a function whose input takes in any data, regardless of length, and outputs a specific unique string for that input. Calling the same function with the same input two times gives you exactly the same output. It is designed in such a way so that you can not find the input from the output.
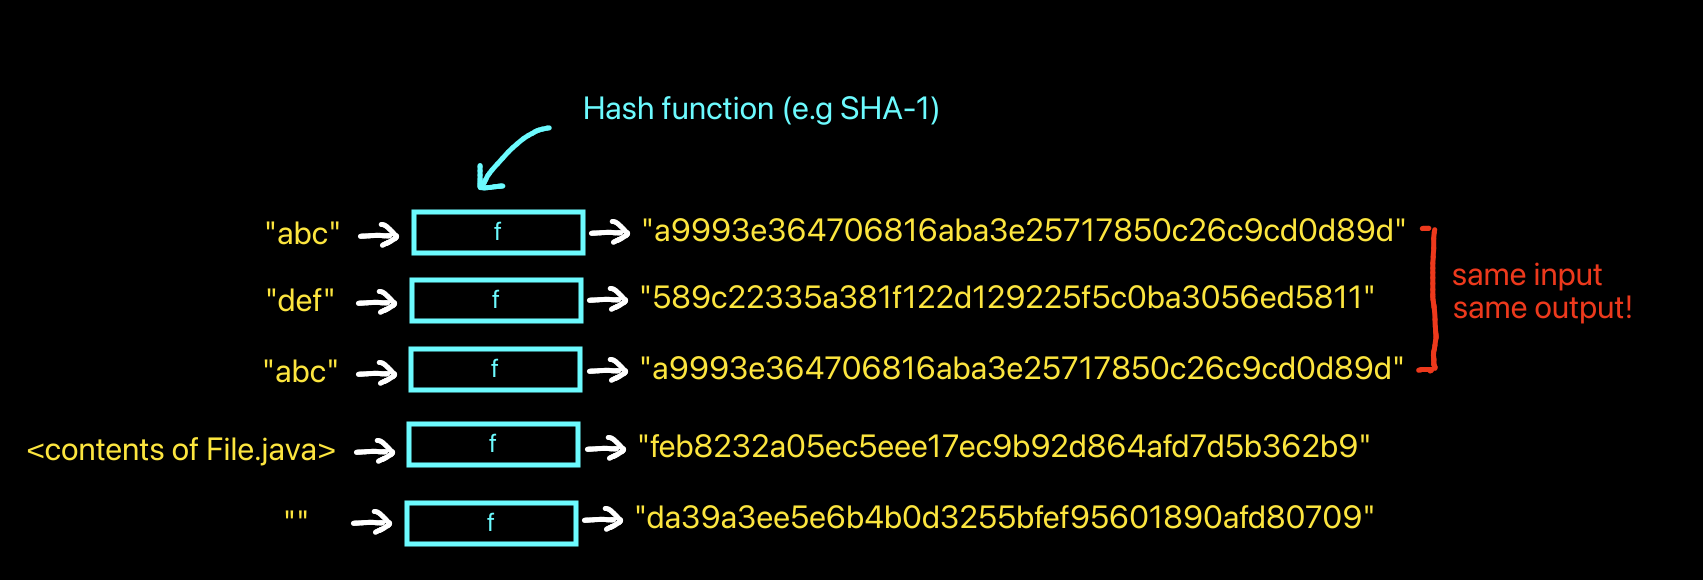
Rough visual of how hashing works. Notice how even an empty string has its own, *unique* hash value.
Imagine the potential of this. Of course, hashing enables a lot of technologies and systems. For dealing with a user's password in a database, we can store the hash of their password instead of the raw password, and consequently compare that saved hash in the database against the hashed password input by a user in the login page. If the hashes match, it strongly suggests the user provided the correct input that produced the expected hash, thereby granting them access to their account. This also means that those who have read access to the database, are unable to view the raw password for each user. And remember, there is no algorithm to calculate the input from the hash. Hashing functions are a one way road.
The unit of git — blobs
Everything starts from a blob1. What is a blob? In Git’s world it is just a
sequence of raw bytes, stored without any filename or directory attached to it.
There is no hierarchy and no extra metadata like timestamps or permissions
inside the blob itself, only the content. To make this less abstract, think
about the contents of a source file like File.java, the bytes of your PNG logo,
or the text of your SSH public key. If you strip away their filenames and
locations and only keep their bytes, each of those could become a blob.
From this point forward I will denote blob objects with a pink rectangle in our diagrams, with the first few characters of the object’s hash (its object ID) underneath. That short prefix is usually enough to distinguish one object from another in a repository.

An example of a blob, with its object ID right below it.
Time to make a blob
I would like to introduce you to your first (plumbing2) and most
essential git command: git hash-object3.
What git hash-object simply does is that it takes in data that you pass
on to it and from that data, it computes a hash4 which is then used as the ID of that object. And
from that, we get an "object ID".
As a first case scenario, we will create our first blob object by passing
the blob contents from stdin. We have to let git hash-object know that
we would like to pass the blob contents from stdin by passing it the
--stdin flag. By default, git hash-object does not save the object
to the database, but it shows you what its object ID would be in stdout.
To indicate that you would like the object written to the objects database
besides showing the object ID to the output, we have to pass in the -w
parameter. Here is the full command that achieves this:
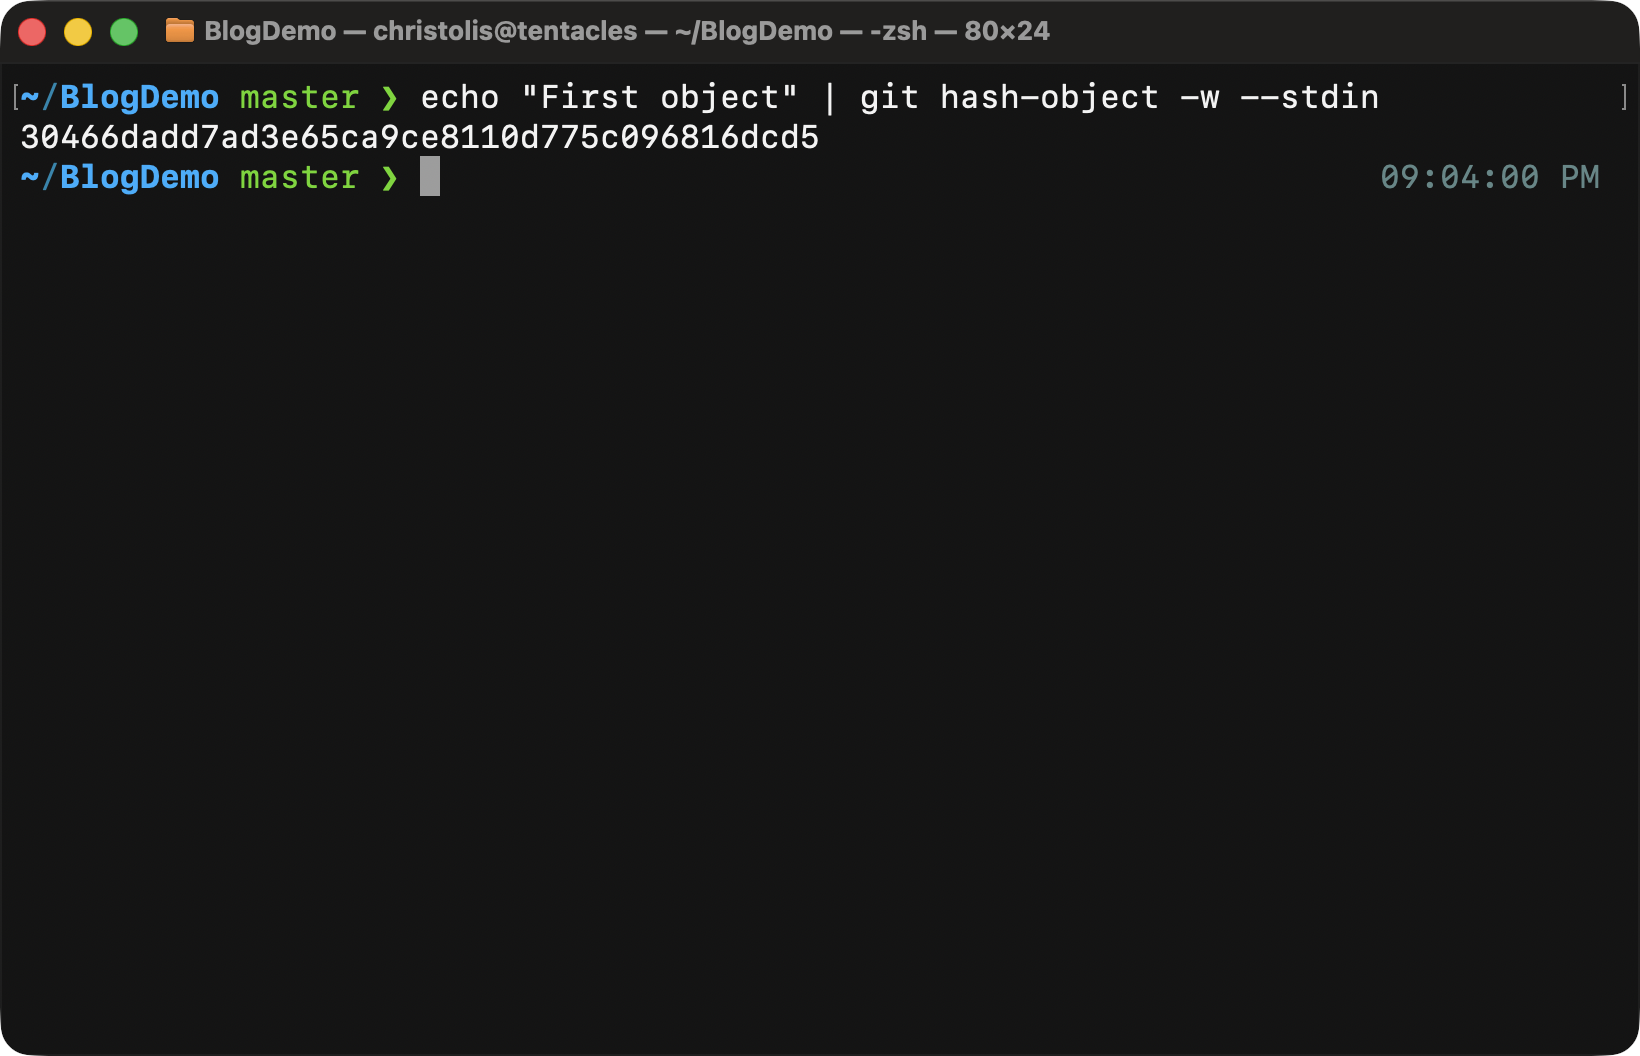
Notice when we call the aforementioned command, we only get back the object ID that the git program calculated. Since we passed in the -w parameter, it gets saved in our database too.
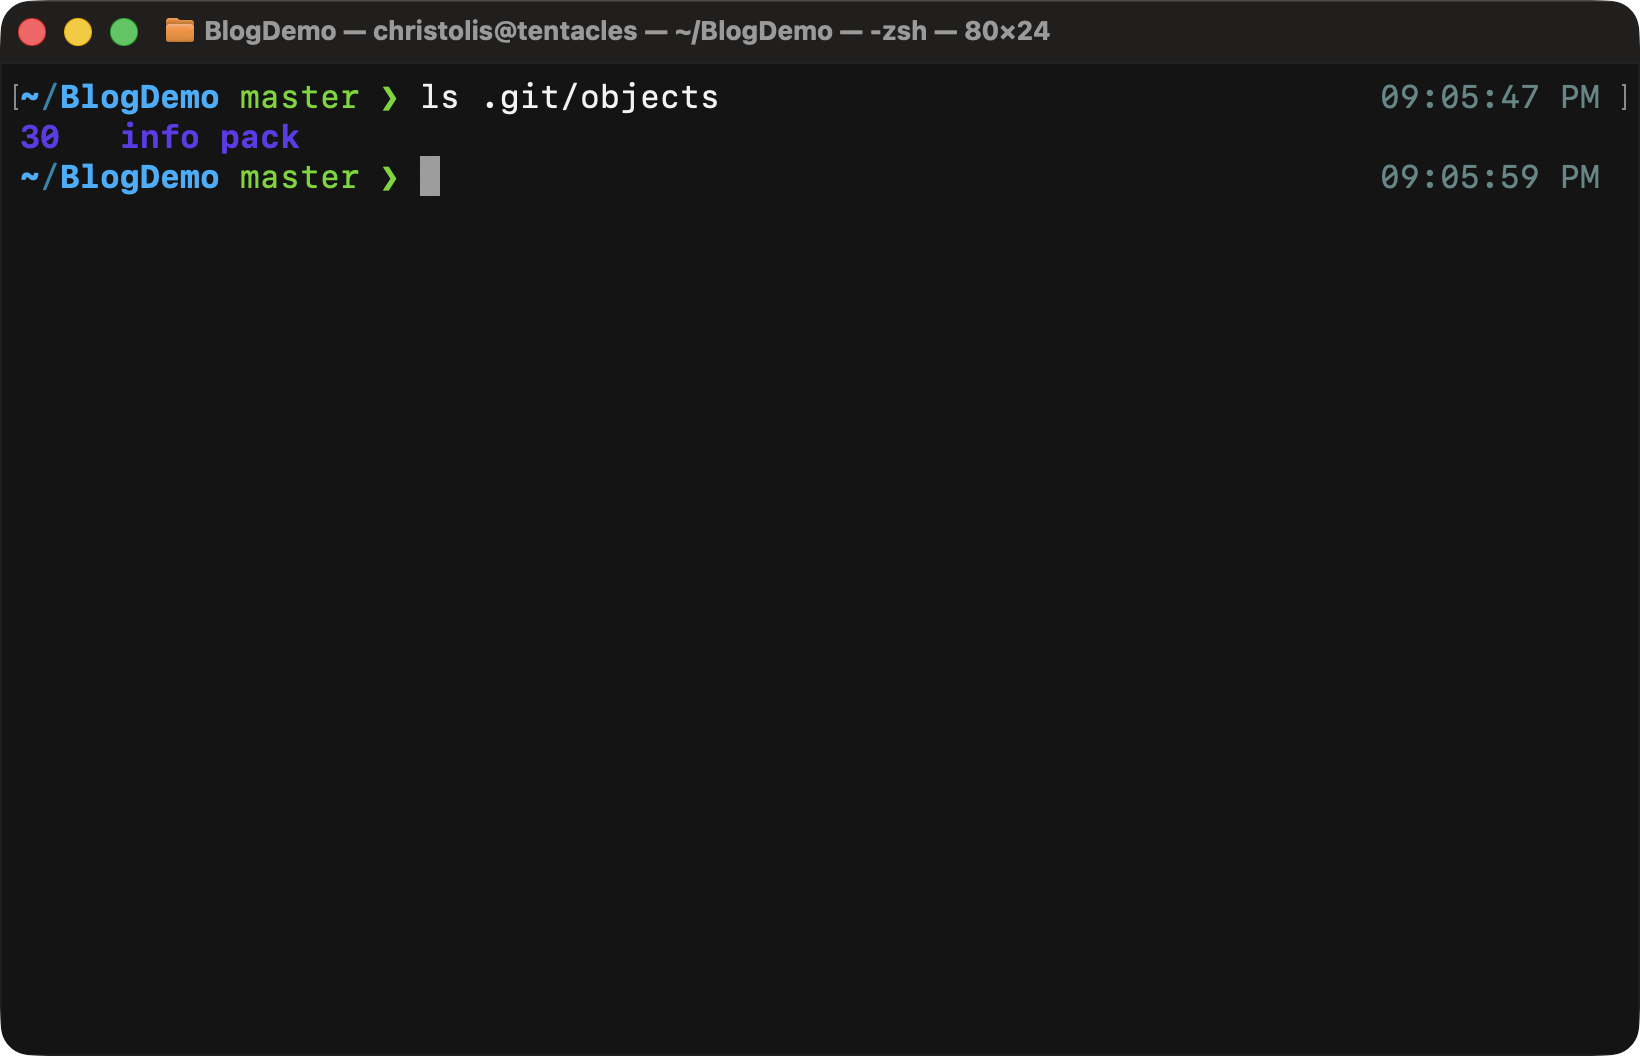
Our objects' database after calling the git hash-object command. Notice how our object is... Wait. What happened to the rest of the letters? A folder called 30?
That's right. A folder. You would think the git developers would make it that easy and obvious, but unfortunately, life has more limitations than we think sometimes.
Look at the first 2 letters of that folder. 30. It's the first two
letters of the ID of our new object:
30466dadd7ad3e65ca9ce8110d775c096816dcd5. And look at what's inside the
folder:
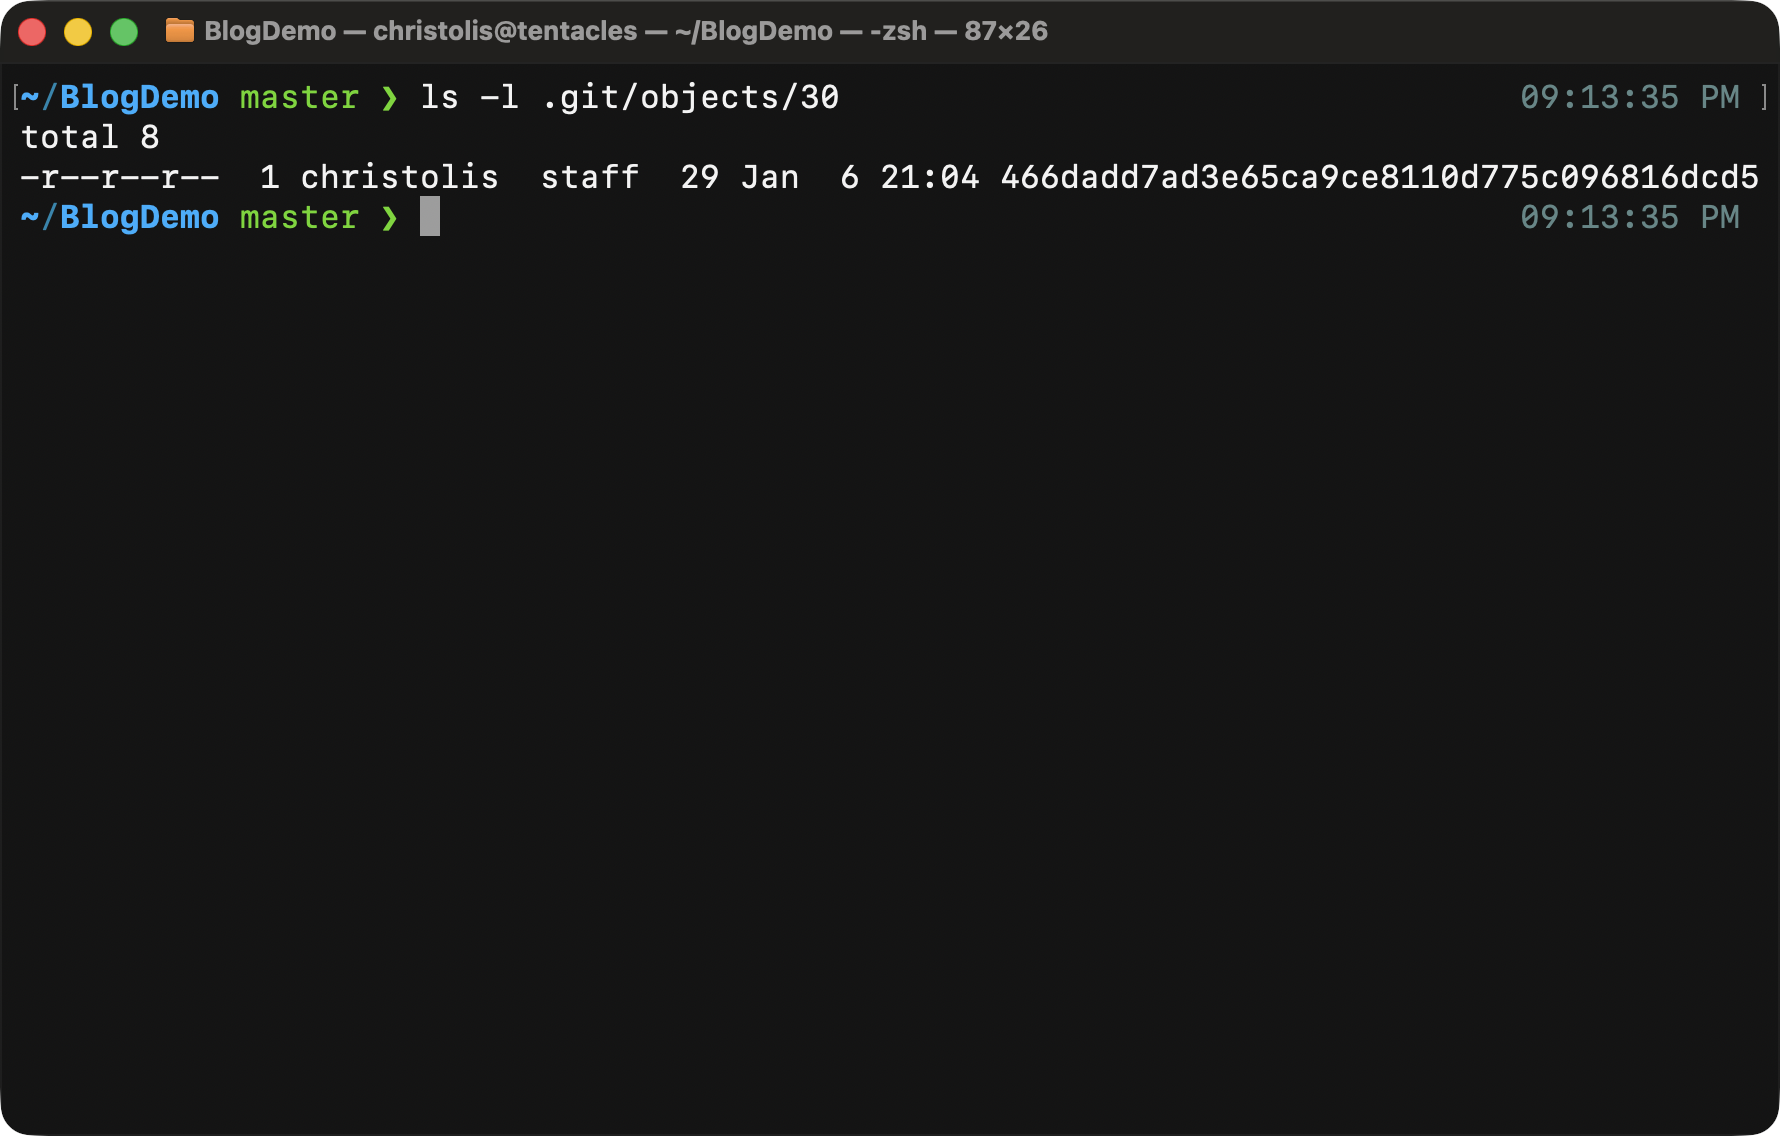
A file with the rest of the object ID is found here.
Notice how that file's name does not contain the first two letters, of the object ID, therefore be cautious of that while browsing through that directory.
What happens if we try to get the contents of that file? Maybe if we run:
Perhaps that might show us our "First Object" message we input previously? You can see what happens below when we run this command.
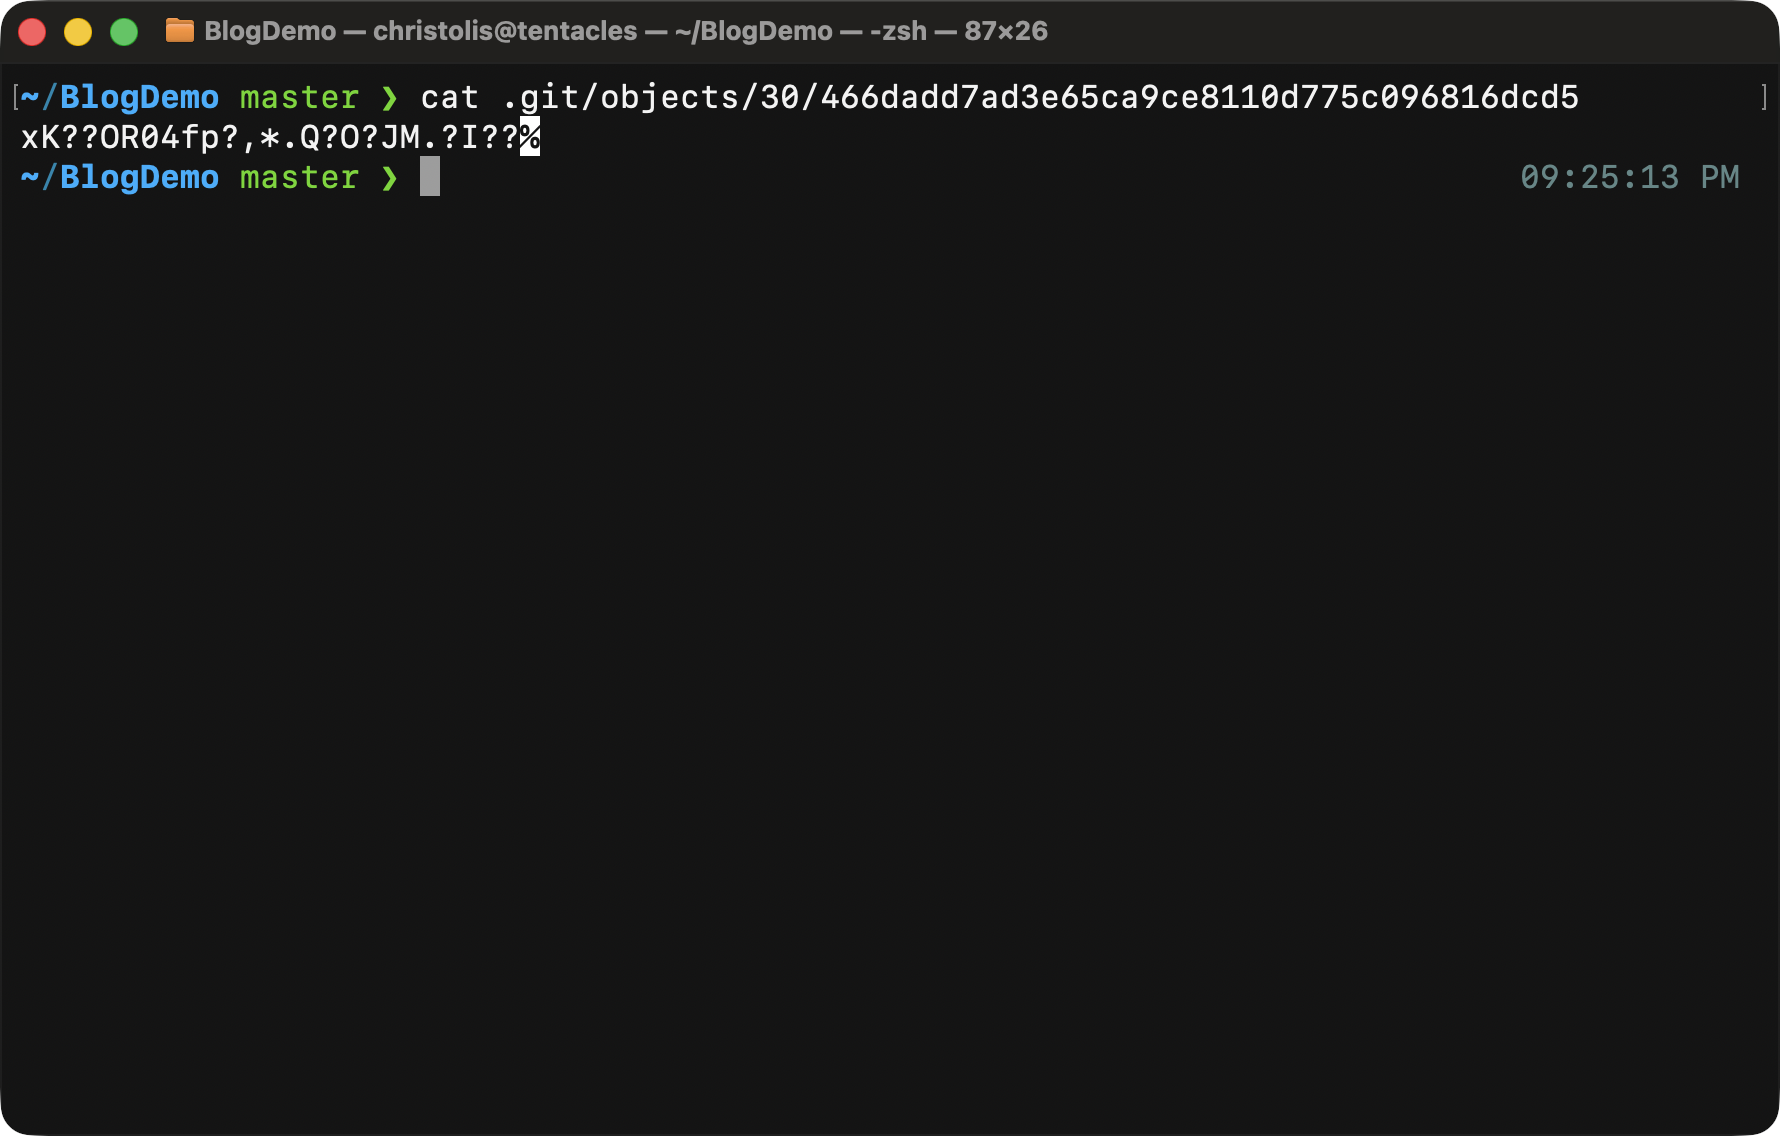
Oh oh... seems like something wrong or unexpected happened here.
There's absolutely nothing to worry about though. You have to understand that directly accessing the object like that leads to the viewing of some metadata that is stored with each object. Besides that, the whole object gets compressed using zlib.
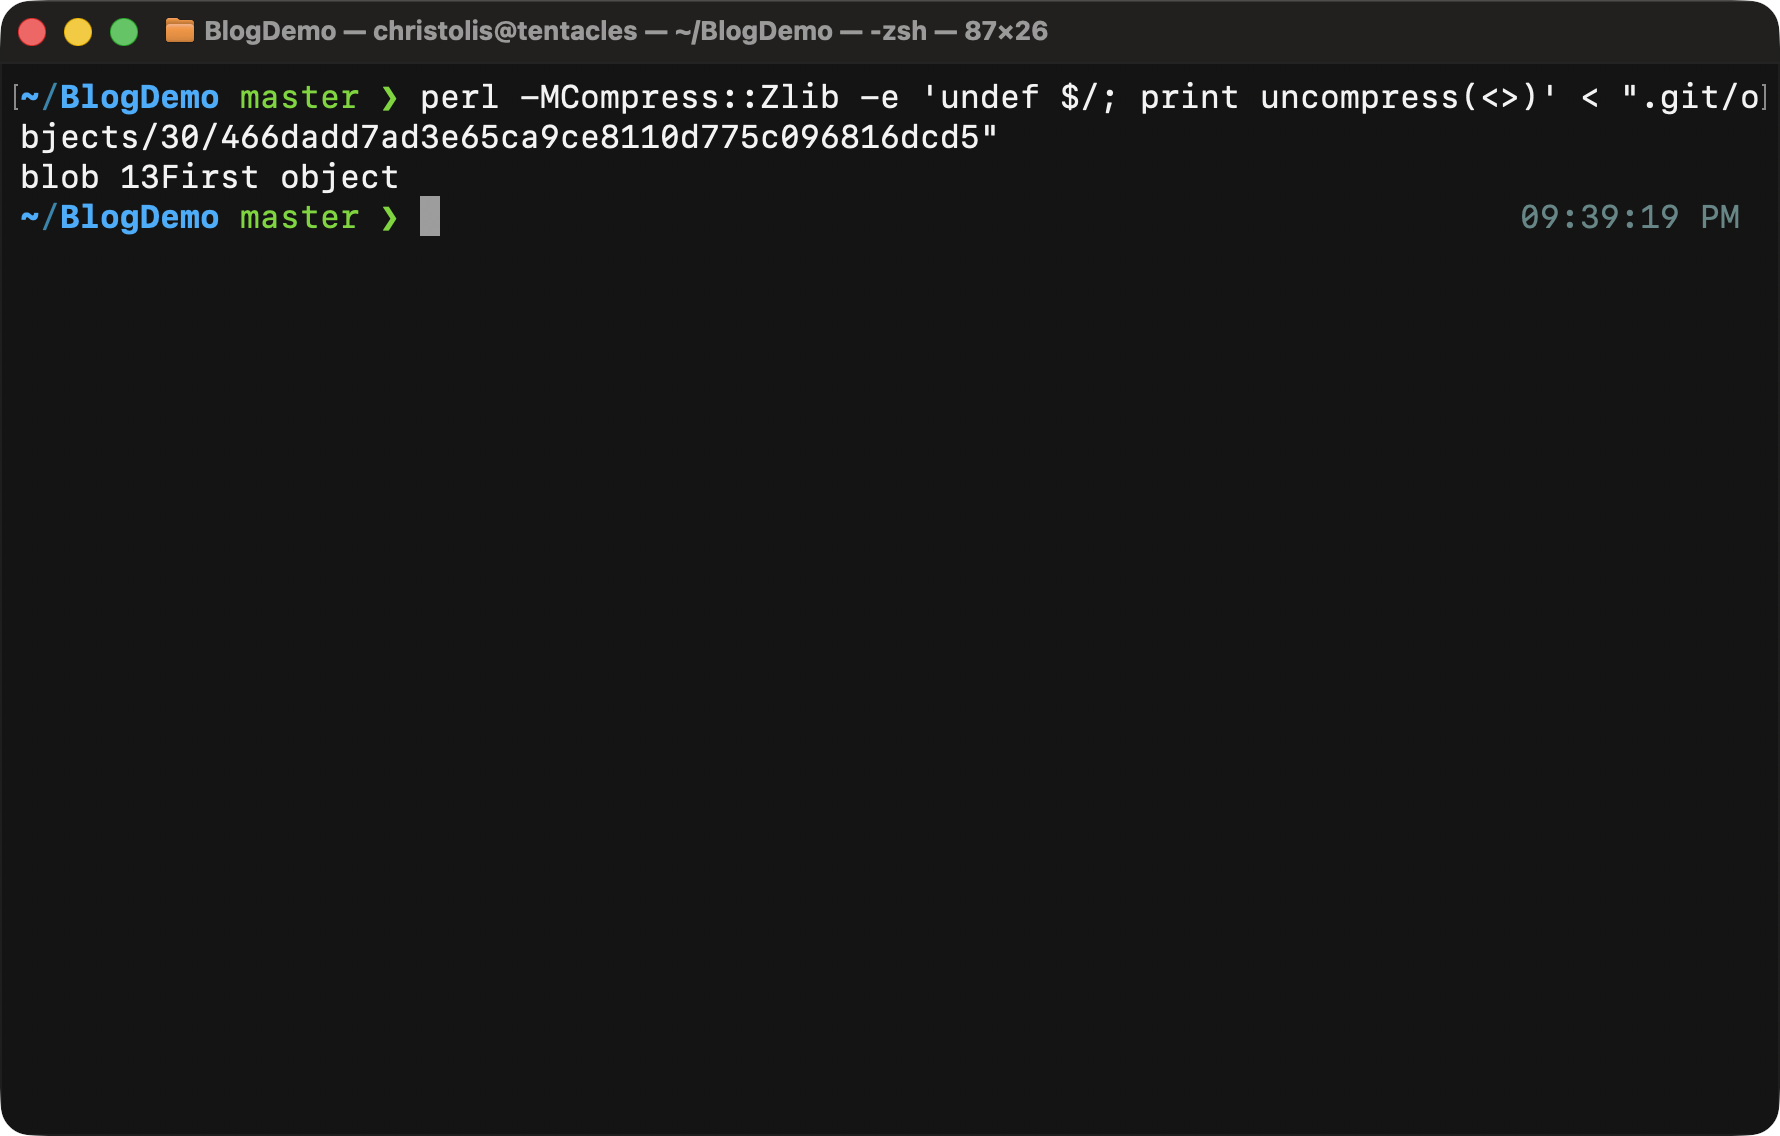
Here is what you see when you decompress this file. It starts with 'blob' which is the object type, a space character right after, and then the size of the contents (13 characters in our case.) Finally, the contents themselves follow suit.
There is obviously a much better way to view the contents of your objects.
More specifically, we use yet another plumbing command: git cat-file.
Notice the cat in git cat-file. This tells us that it behaves
similarly with the cat command, but it focuses on git objects instead.
Here is how you might use it:
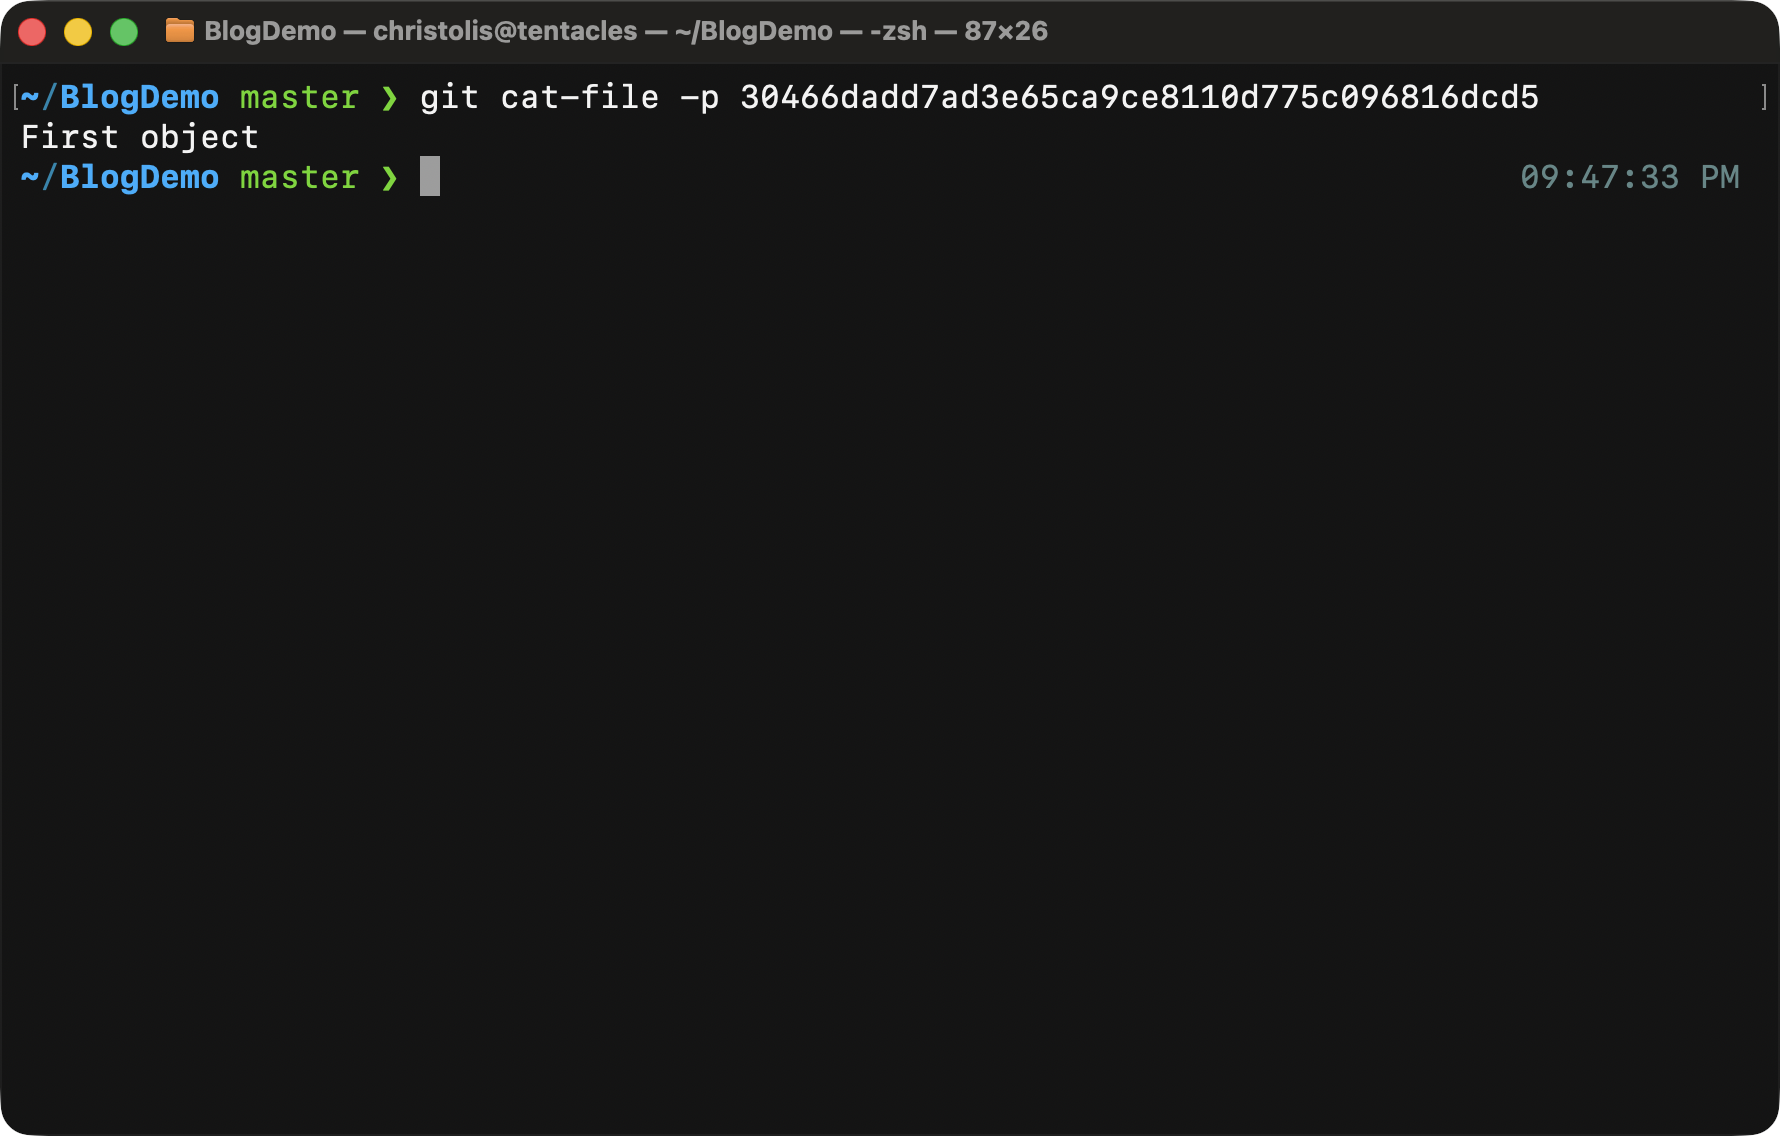
Running this command gives you the contents of your object. Very convenient, right? It's a very handy command to know.
The -p parameter pretty-prints the contents of the object depending on
its type. Another useful parameter is -t, which just prints the type of
the object. All you have to do is give it the object ID and it will give you
back what kind of object it is.
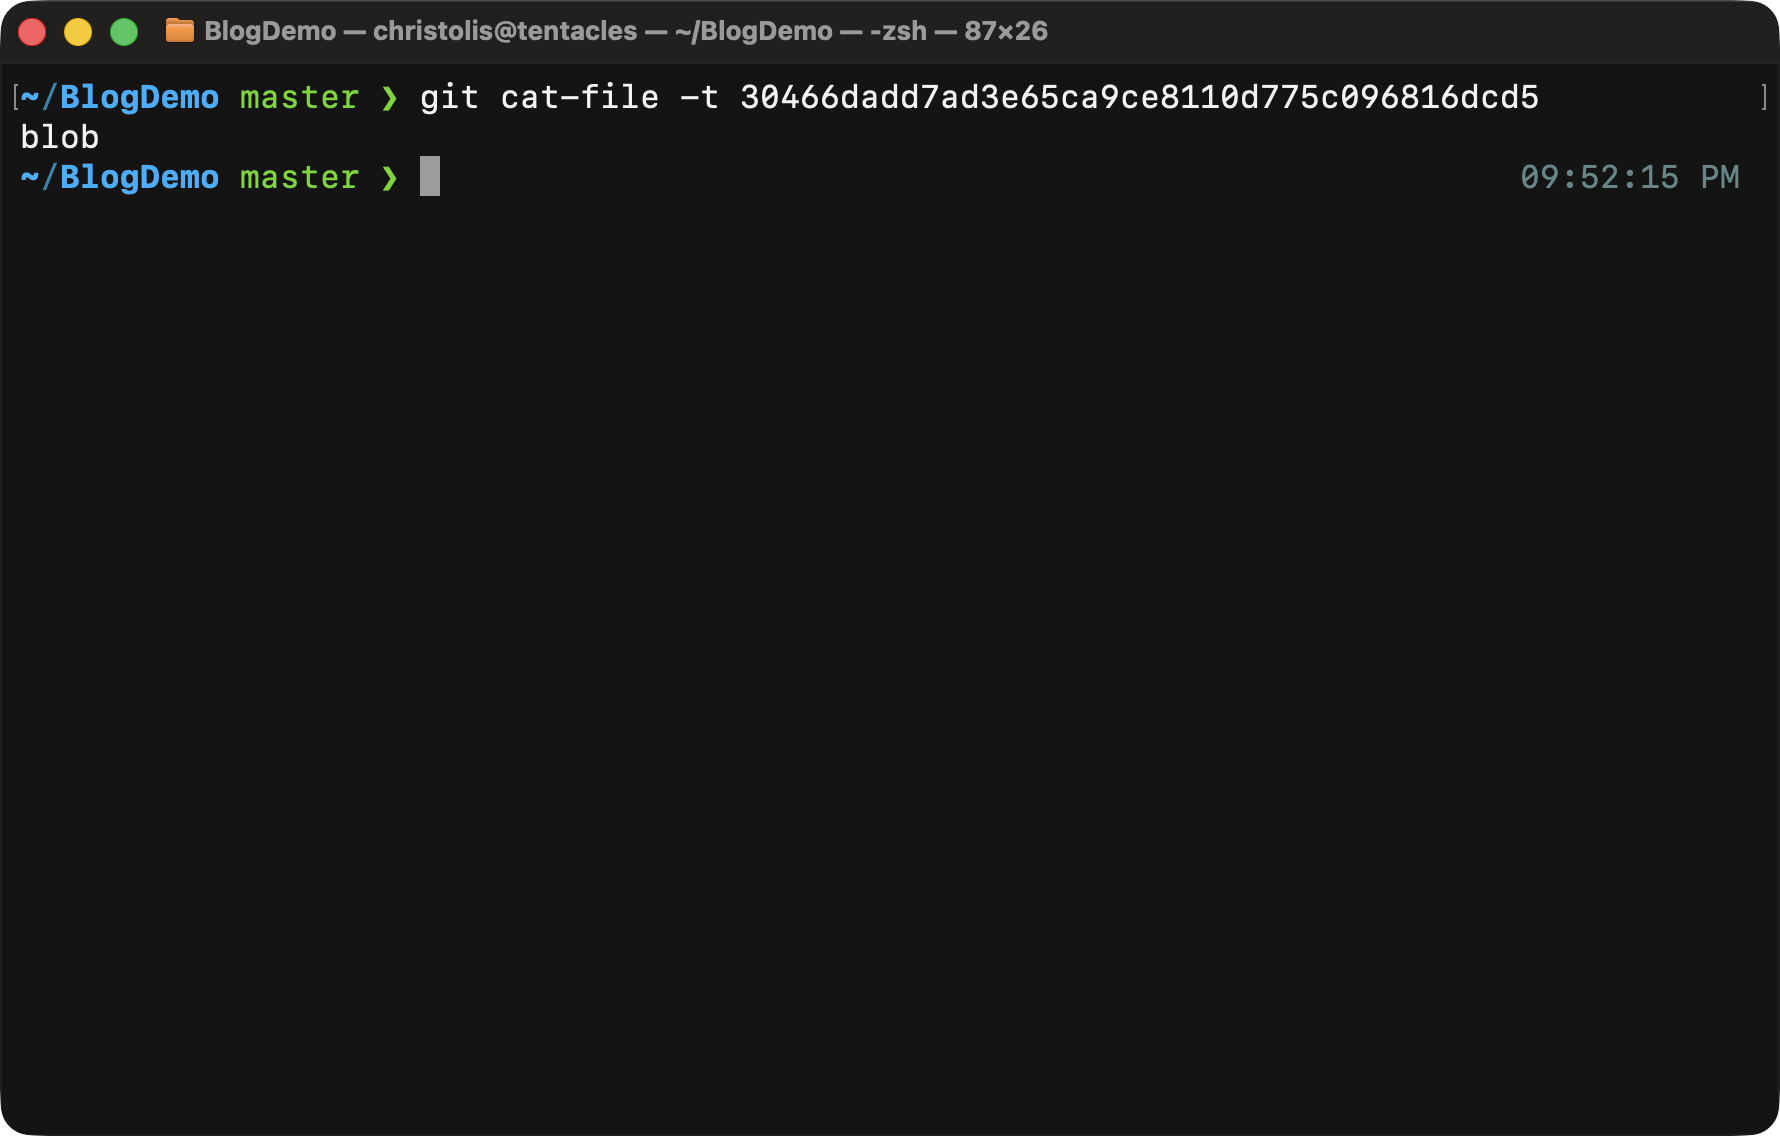
Running the same command with the -t parameter gives you the type of the object.
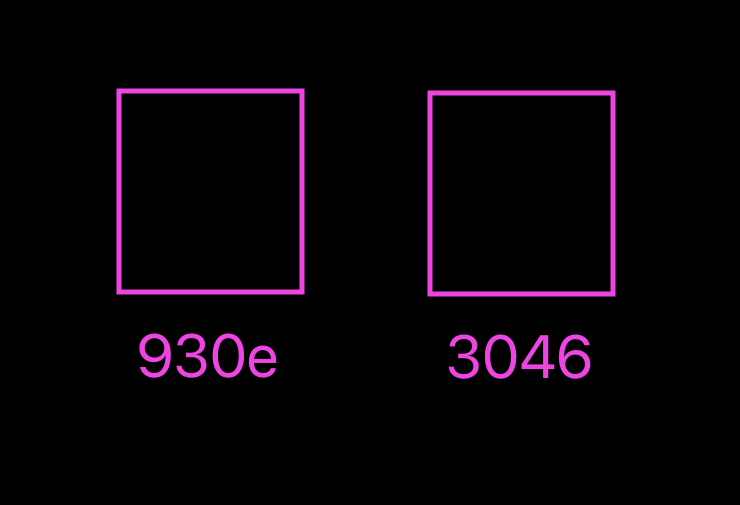
For the purposes of demonstration, I will create one more blob object in our database, but this time we will get the contents of that blob from a file:
Assuming you have executed the above commands correctly, you will now have
a new object in your database with the ID of
930e0729eb0d941431cfc8e8d51172e05f5eb8b9.
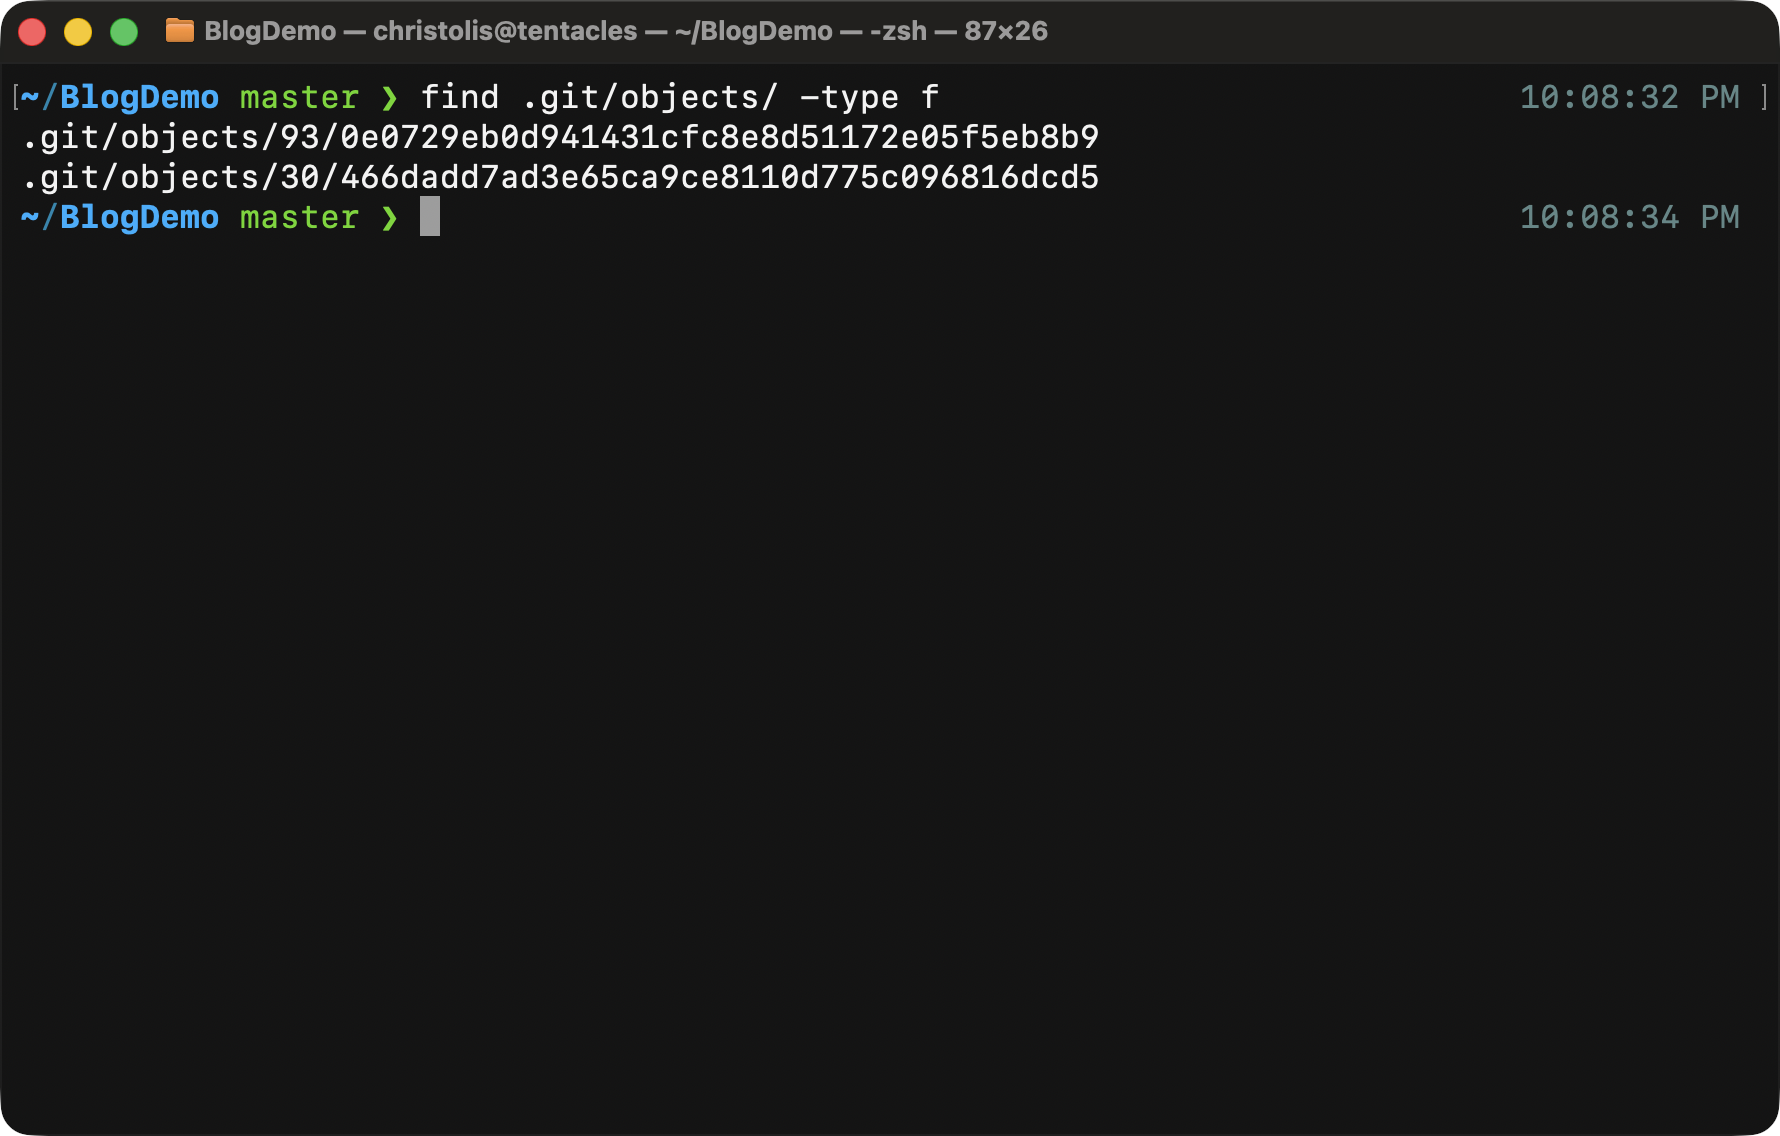
A quick check to see all of the objects in our Git database. We can see two objects, one added directly from stdin, the other using the contents of a temporary file.
How our database looks like from a visual perspective.
The git folders — trees
So far we have added 2 blob objects into our database, but this isn't really useful as of right now. Sure, we can get back our contents in some way, but it doesn't seem to serve an important purpose. Hang really tight here and be patient, we are just introducing different object types, they are all important.
A simple way to think about trees is that they are like "folders" in files. A tree is a container for other trees and/or blobs. A minor difference is that the trees are also responsible for the names of these objects in our tree.
How we will visualize trees from this point forward.
So how do we create these trees? Is there another command like git hash-object but equivalent for making trees? The sad news is that it's a
little different this time.
To explain it as straightforward as possible, you have to "build" that tree in
your staging area (more on what that is further down below) and then use yet
another command called git write-tree.
I challenge you to try to call git write-tree as you are right now in
the repository. Notice what happens.
Hmm, a new object was created? That's wild.
How our object database is looking right now visually.
The command we executed did not hesitate making an object for us. Let's investigate what this object is and what it contains using our recently-learned commands.
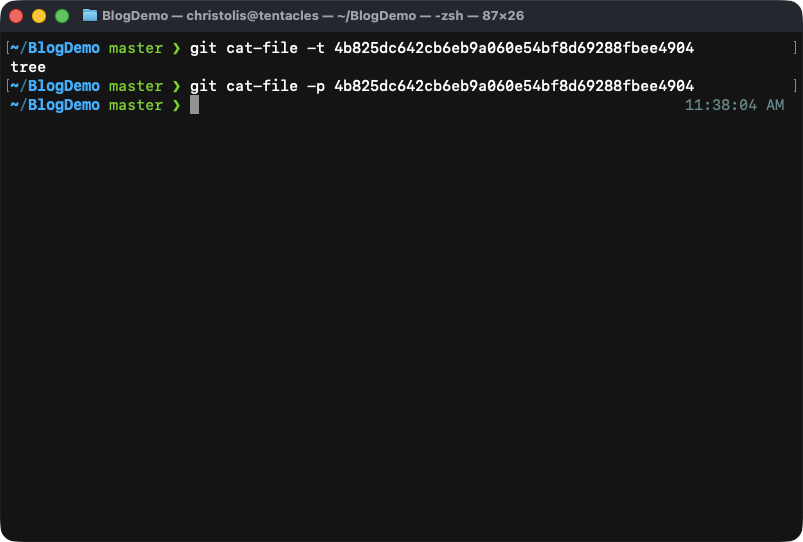
Look at the type of the object. It's a tree. That's our expected behavior! But then look at what happens once we peek at the contents. We suddenly get nothing in return. Like the command failed to do its job. But it didn't, it's intentional!
What's happening here? Haven't we made 2 objects already? Shouldn't we see them added in here? Well the answer is simple: we didn't populate our staging area.
The staging area
The staging area, as you might have guessed from now, is a place where new trees that we create know what children they should have. Without the staging area, trees have no idea what they are going to contain. And manually specifying what contents they will have from the command itself every time is tedious and unnecessary.
You might be familiar with the term "staging area" and its synonyms "cache" or "the index". They are all the same thing and are mostly used interchangeably. You are free to use any term to refer to the same idea.
For those who have used git a little bit before and played around with it,
you might have called the command git add a few times. Behind the
scenes, you edit the staging area by calling this command.
The way to edit this staging area manually is to use yet another command called
git update-index.
Let's try to call this command by adding our object 930e with the
contents "Second object" to the staging area:
The --add flag indicates that we are trying to add a new object into the
staging area.
The --cacheinfo flag indicates that we are going to provide the metadata
of the object ourselves (the name of the file, the file permissions, the
filetype, etc)
The number 100644 means that the file is a normal, non-executable
file. Let's say we are adding an executable file instead, then the number
would be 100755. There are more numbers of course, but let's keep it
simple for now.
What follows next is the full object ID which our tree will point to, in this
case it's 930e..., which is a blob containing "Second object".
Finally, now is our chance to provide a name for this file. We choose
ourstagedfile.txt.
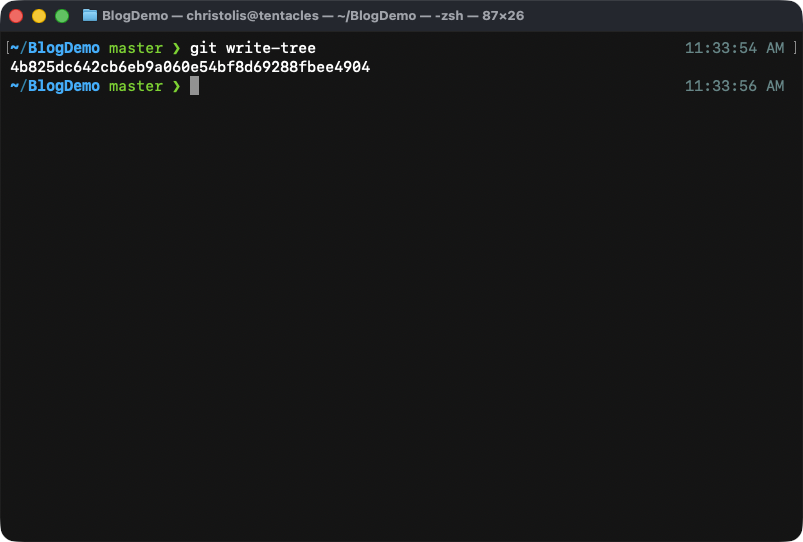
What's left for us to do now is to create our tree with contents this
time. All we have to do is to just call the git write-tree command. We do
not have to specify anything after that since this command knows that it
should get its information from our staging area.
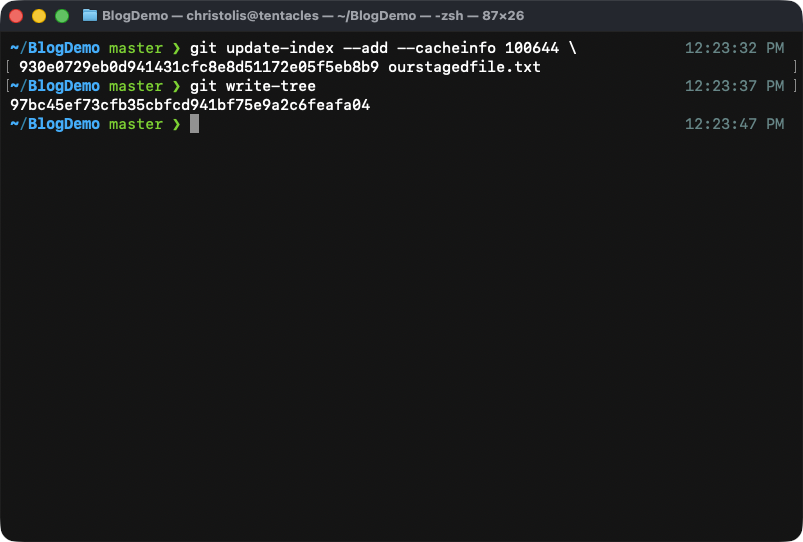
We got ourselves a new tree with the ID of 97bc!
Let's look at the contents of our newly-made tree:
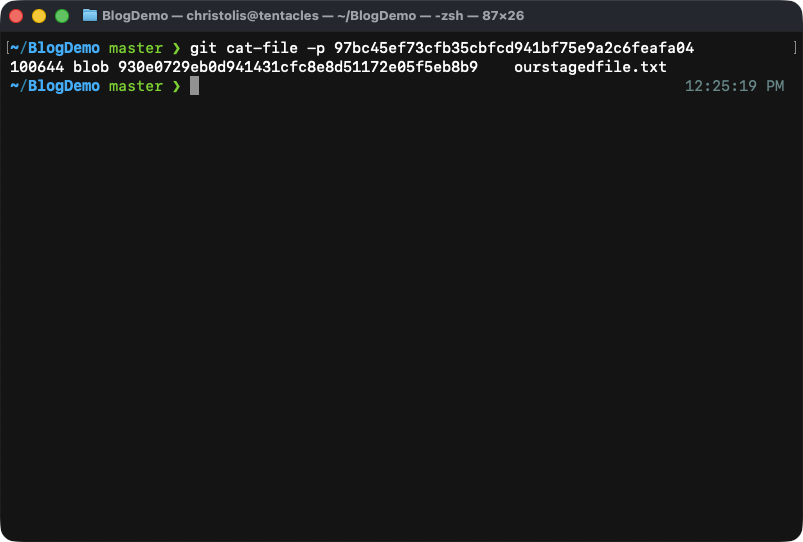
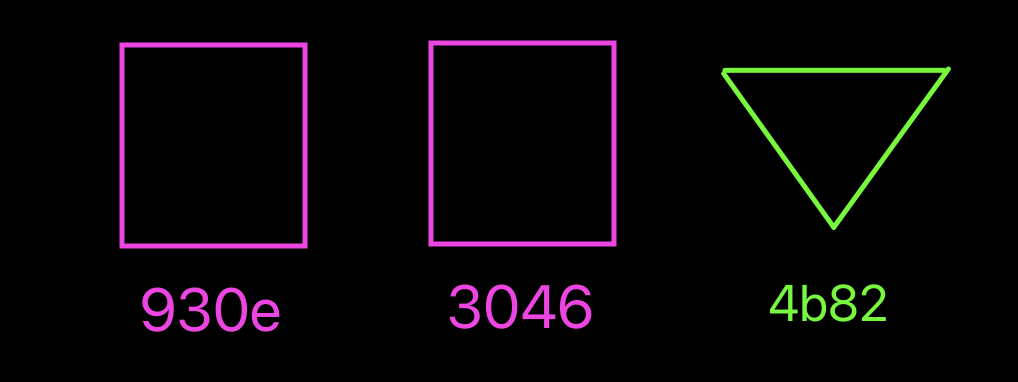
Looking at the contents of our tree, we can see what it contains!
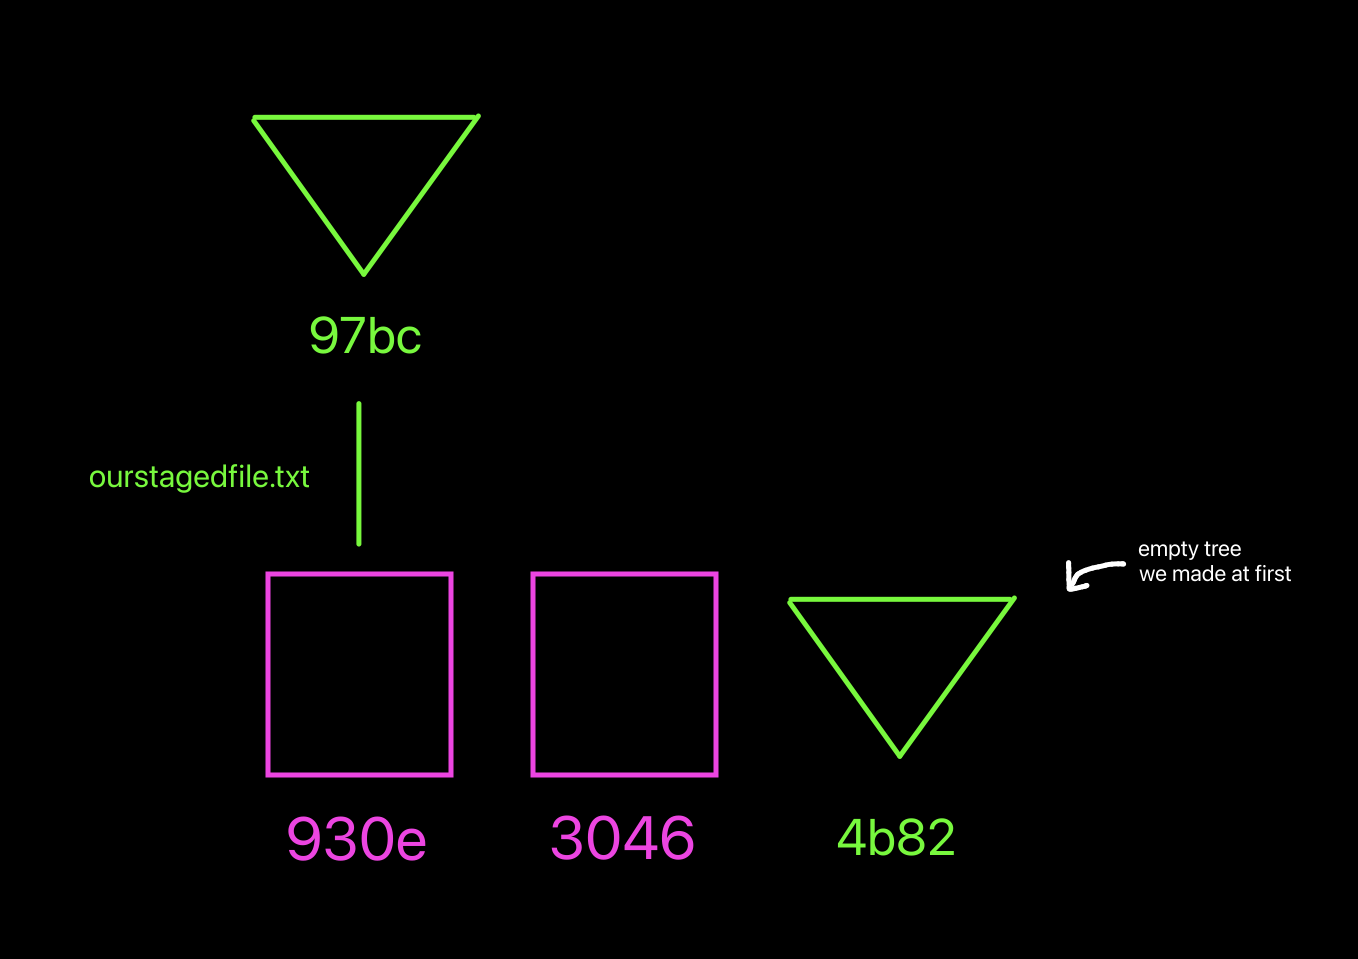
How our object database is looking now visually. Notice how the other object is not linked under a tree because we did not add it to the staging area!
A tree pointing to a tree
So far our tree 97bc contains one blob object 930e. From the
perspective of a file system, it's like we have one "folder" which
contains a file labeled ourstagedfile.txt.
But what if we want to store a "folder"?
The answer lies within trees again. A tree can contain other trees, not just blobs.
What we will do now is to use the newly-made tree 97bc, put it under a new
tree which we will make and then under that new tree, we will add our other
blob object 3046.
It is important to note that at this point, our staging area already
includes ourstagedfile.txt, so we have to remove it from there first. If
we don't do that, we will have this file both in our new tree and inside
our folder.
Let's start with the first step: making a new tree which contains our
already-existing tree 97bc.
Remember that new trees get their information from the staging area. If
we don't update the staging area, then our new trees created with git write-tree will not have what we expect them to have.
To add our tree to the staging area, we call the command git read-tree.
This takes in an already-created tree as an argument, set a name for it
(aka the folder name), and finally it puts it into our staging area. Let's
now put our tree 97bc into our staging area with the folder name of
second_obj_folder:
Then let's create a new tree based on what we currently have in staging area:
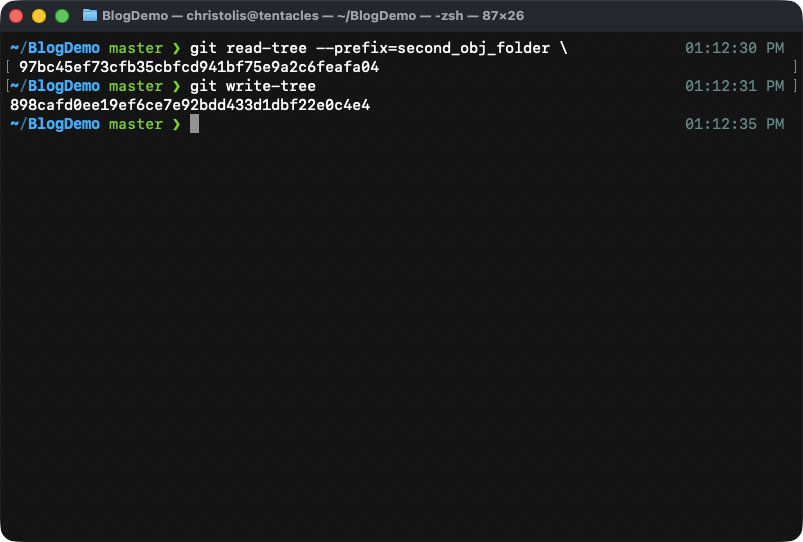
What happens after calling the above commands.

The contents of our new tree. Notice how we now have a folder called 'second_obj_folder'. This is the first tree that we have made!
Let's now add our other object 3046 into the mix by adding it into the
root tree (the new tree that we have created):
Time to put everything under a tree:
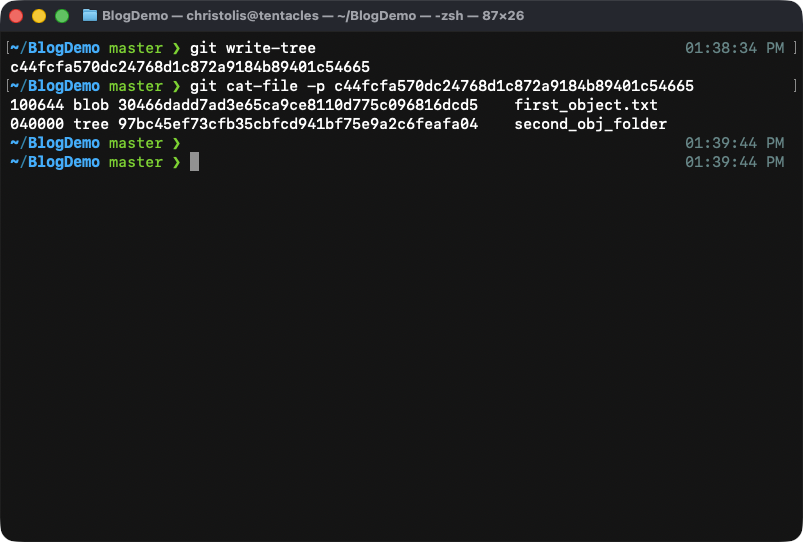
Contents of our new tree.
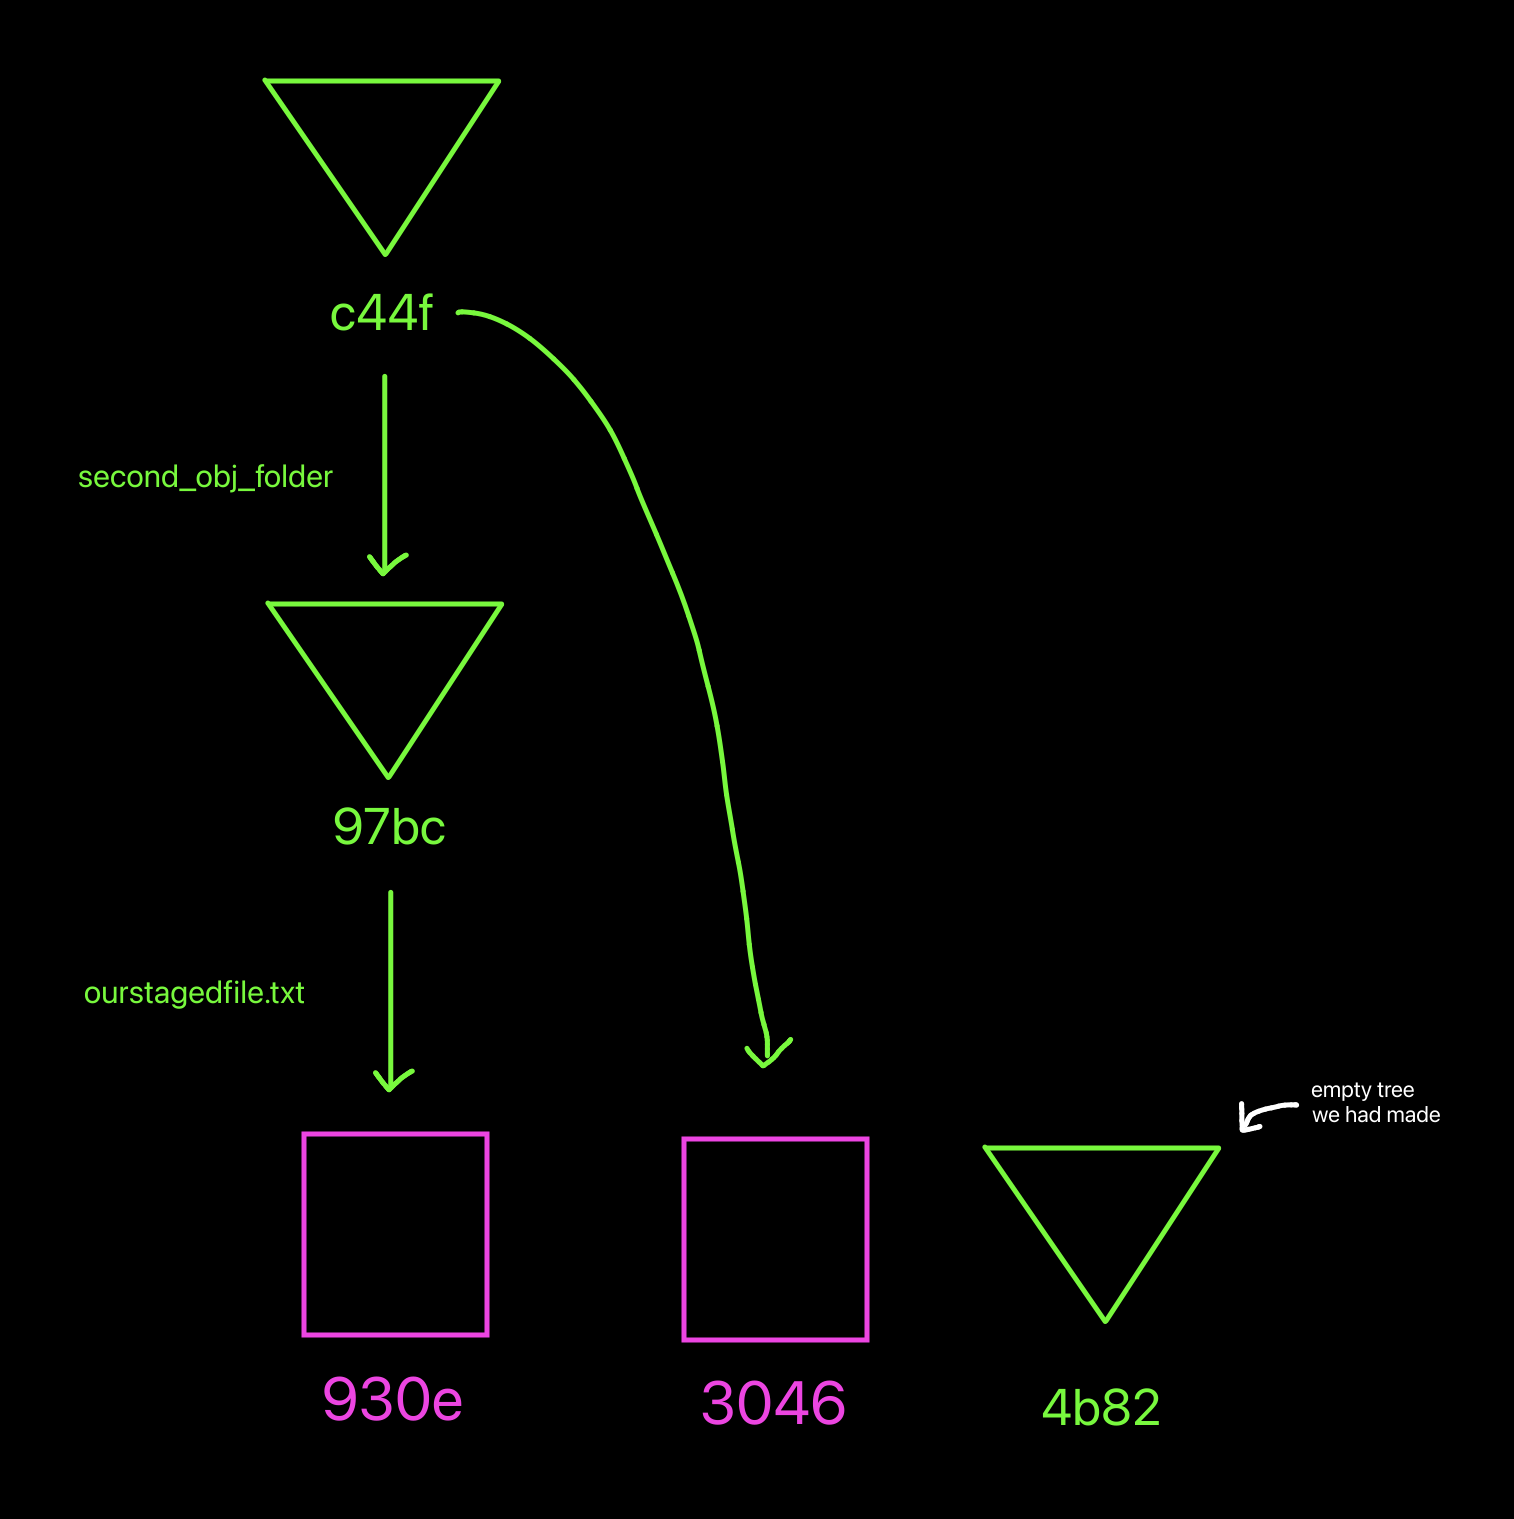
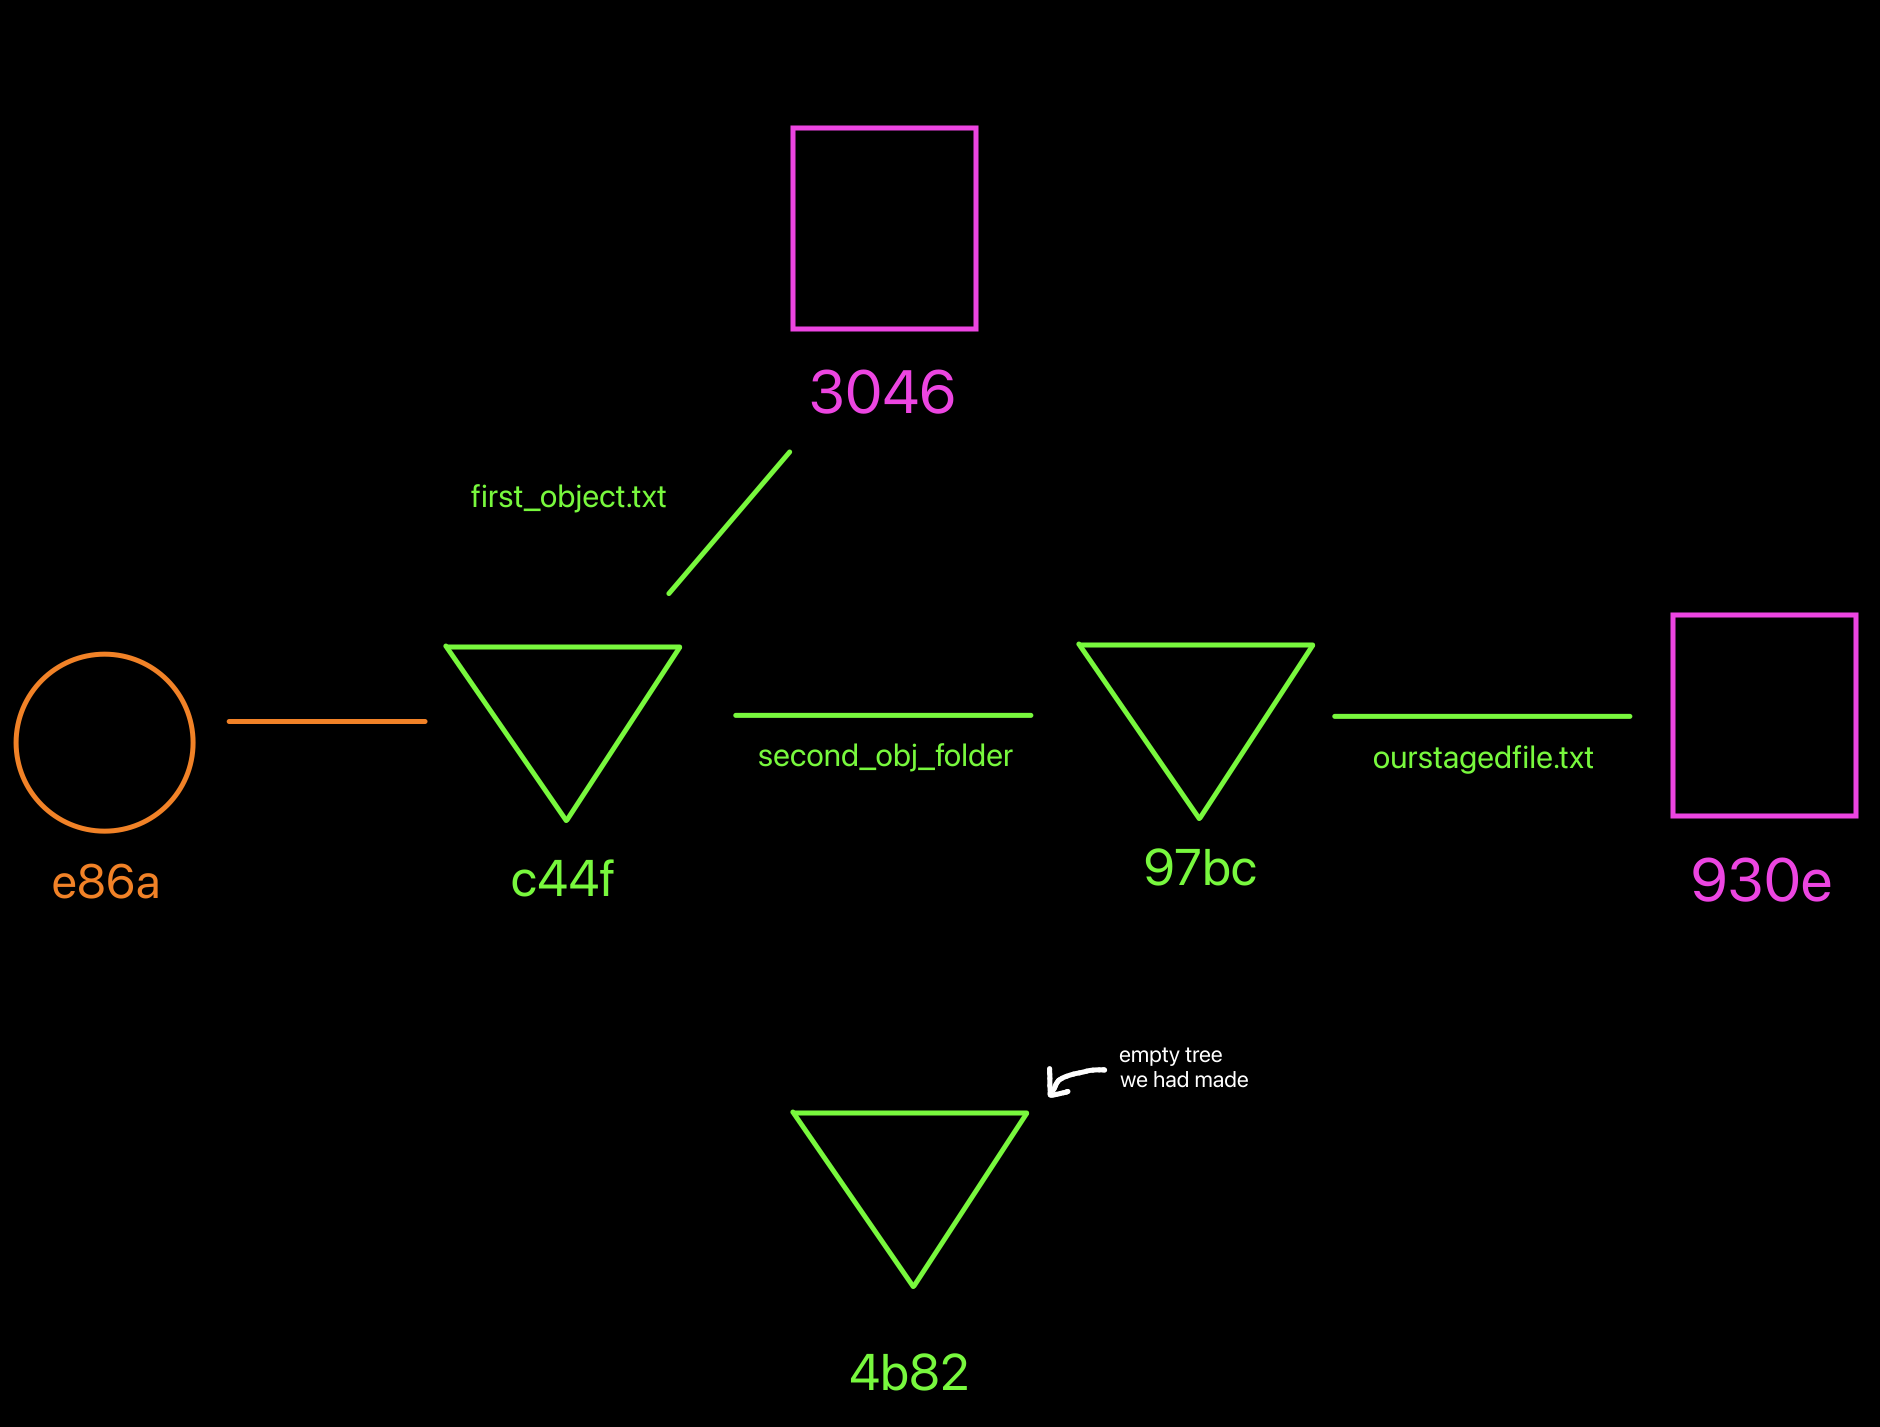
How our object database is now looking visually.
To summarize, a tree is an object type which either contains other trees or blobs.
Say cheese! — commits
In the previous section we learned how to work with trees. We will now cover the third and most known object type in git (finally getting further from the core and reaching normal land). This object type is called a "commit".
In essence, a commit is nothing more than an independent object which references a tree and contains some other metadata like the author of the commit (who made it), a commit message (what changes this tree contains) and optionally a list of parent commits.
We will symbolize a commit object with a circle symbol.

How we will symbolize a commit object from now on.
To understand the reason of this object's existence, you have to remember what makes git so useful as a tool.
Generally, you would be expected to create a commit in order to take a "snapshot" of a list of files or folders you have worked on. Why would you want to do that, you might ask? One reason is because further down the line, you might decide to come back to this snapshot, and your file and folder structure will be exactly as you had left it.
To create a commit, you call the command git commit-tree. This command takes
input from both stdin and from command parameters.
From stdin, git commit-tree takes in the commit message. This implies
that we have to pipe the commit message using a command like echo. And then
one required command parameter is the tree which the commit is going to point
to.
Let's make our first commit from a command:
Notice how we used the abbreviated version of the tree object
c44fcfa570dc24768d1...4665. If there are no two objects starting with
the same characters, then git can automatically figure out which object
you would like to reference.
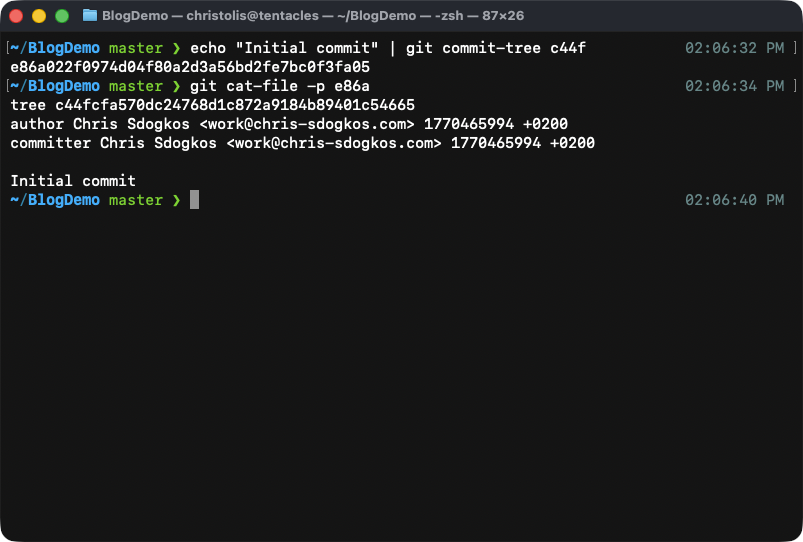
The contents of our new commit object. Notice how it's structured in a way where we can see all the important details relevant to the commit. It begins with a reference to the tree it points to, the author and committer, when we made the commit, and finally our commit message.
How our object database looks like right now.
Adding a commit with a parent
Problem
For the sake of learning, suppose that we would like to change the contents of
first_object.txt because either we forgot to have something added and/or
removed.
Solution
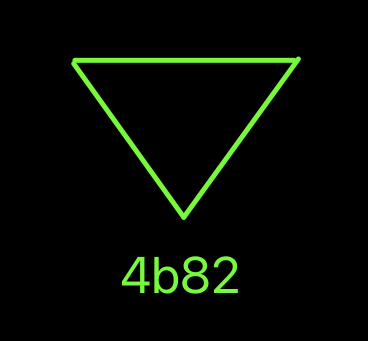
Since the blob object 3046 is immutable, we have to re-create a new blob
with our changes.
Firstly, let's remove the 3046 blob object from the staging area:
Then let's create the first_object.txt replacement with our new changes:
Let's now add the new blob 0d82 to our staging area:
Now that our staging area is updated, let's transfer everything to a new tree (remember that we can not edit already-existing trees, all objects are immutable):
Finally let's create a commit that points to our updated tree, and is also
indicating that its parent commit is e86a:

How our object database looks like at the moment. Notice how the original first_object.txt file remains the same! The new one with the changes included (0d82) is an entirely new object.
This is a very important detail to understand. Let's say you have a list of names called "A" which contains 1000 entries.
Assuming you want to add a new name to that file, you have to duplicate this entire file with the 1001st name included into a file B.
That way, it's easy for us to go back in time and see how files and folders used to be at a specific point in time (with the commit being our snapshot in time and helping us time travel)
Adding waypoints to our commits — refs
Look at that entire tree of objects we have. We need to be able to move around in time as promised. To achieve this, we have a few tools in our arsenal. Introducing: refs.
Think of a ref (short for reference) as a hand with the index finger pointing. That's all it does really. Its special property is that it can move around. Another important detail is that refs point to objects that are of type 'commit'.
A ref in its natural habitat.
Refs in the .git/ folder can be found in .git/refs. We can find two
types of refs: a normal ref found in refs/heads/ and a tag ref found in
refs/tags/.
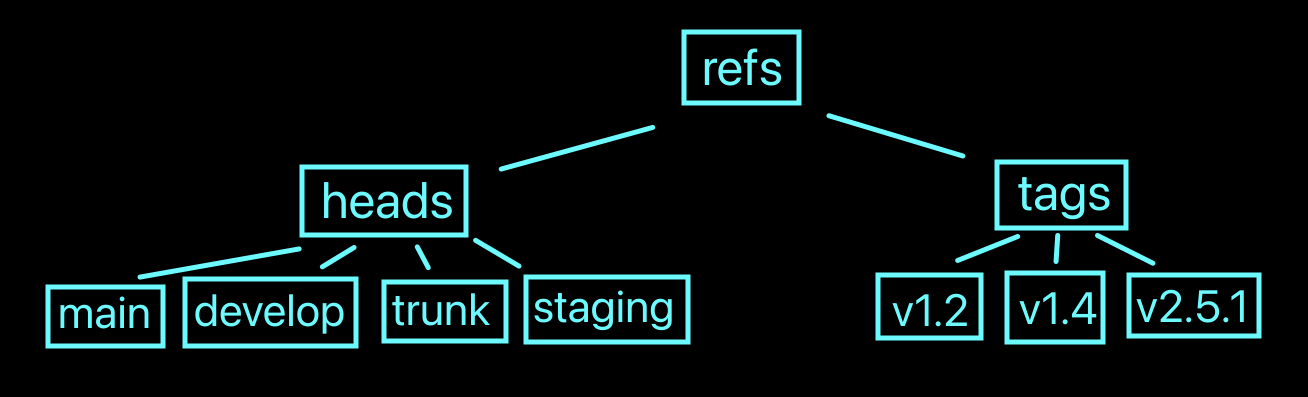
How refs are split up and some examples of them. The names of them can be anything really but what's included here is a list of examples you might spot in repositories.
To create a new ref in the plumbing world, we use the command git update-ref.
Let's use this to make a new ref point to our "Second commit" with ID
ff4a:
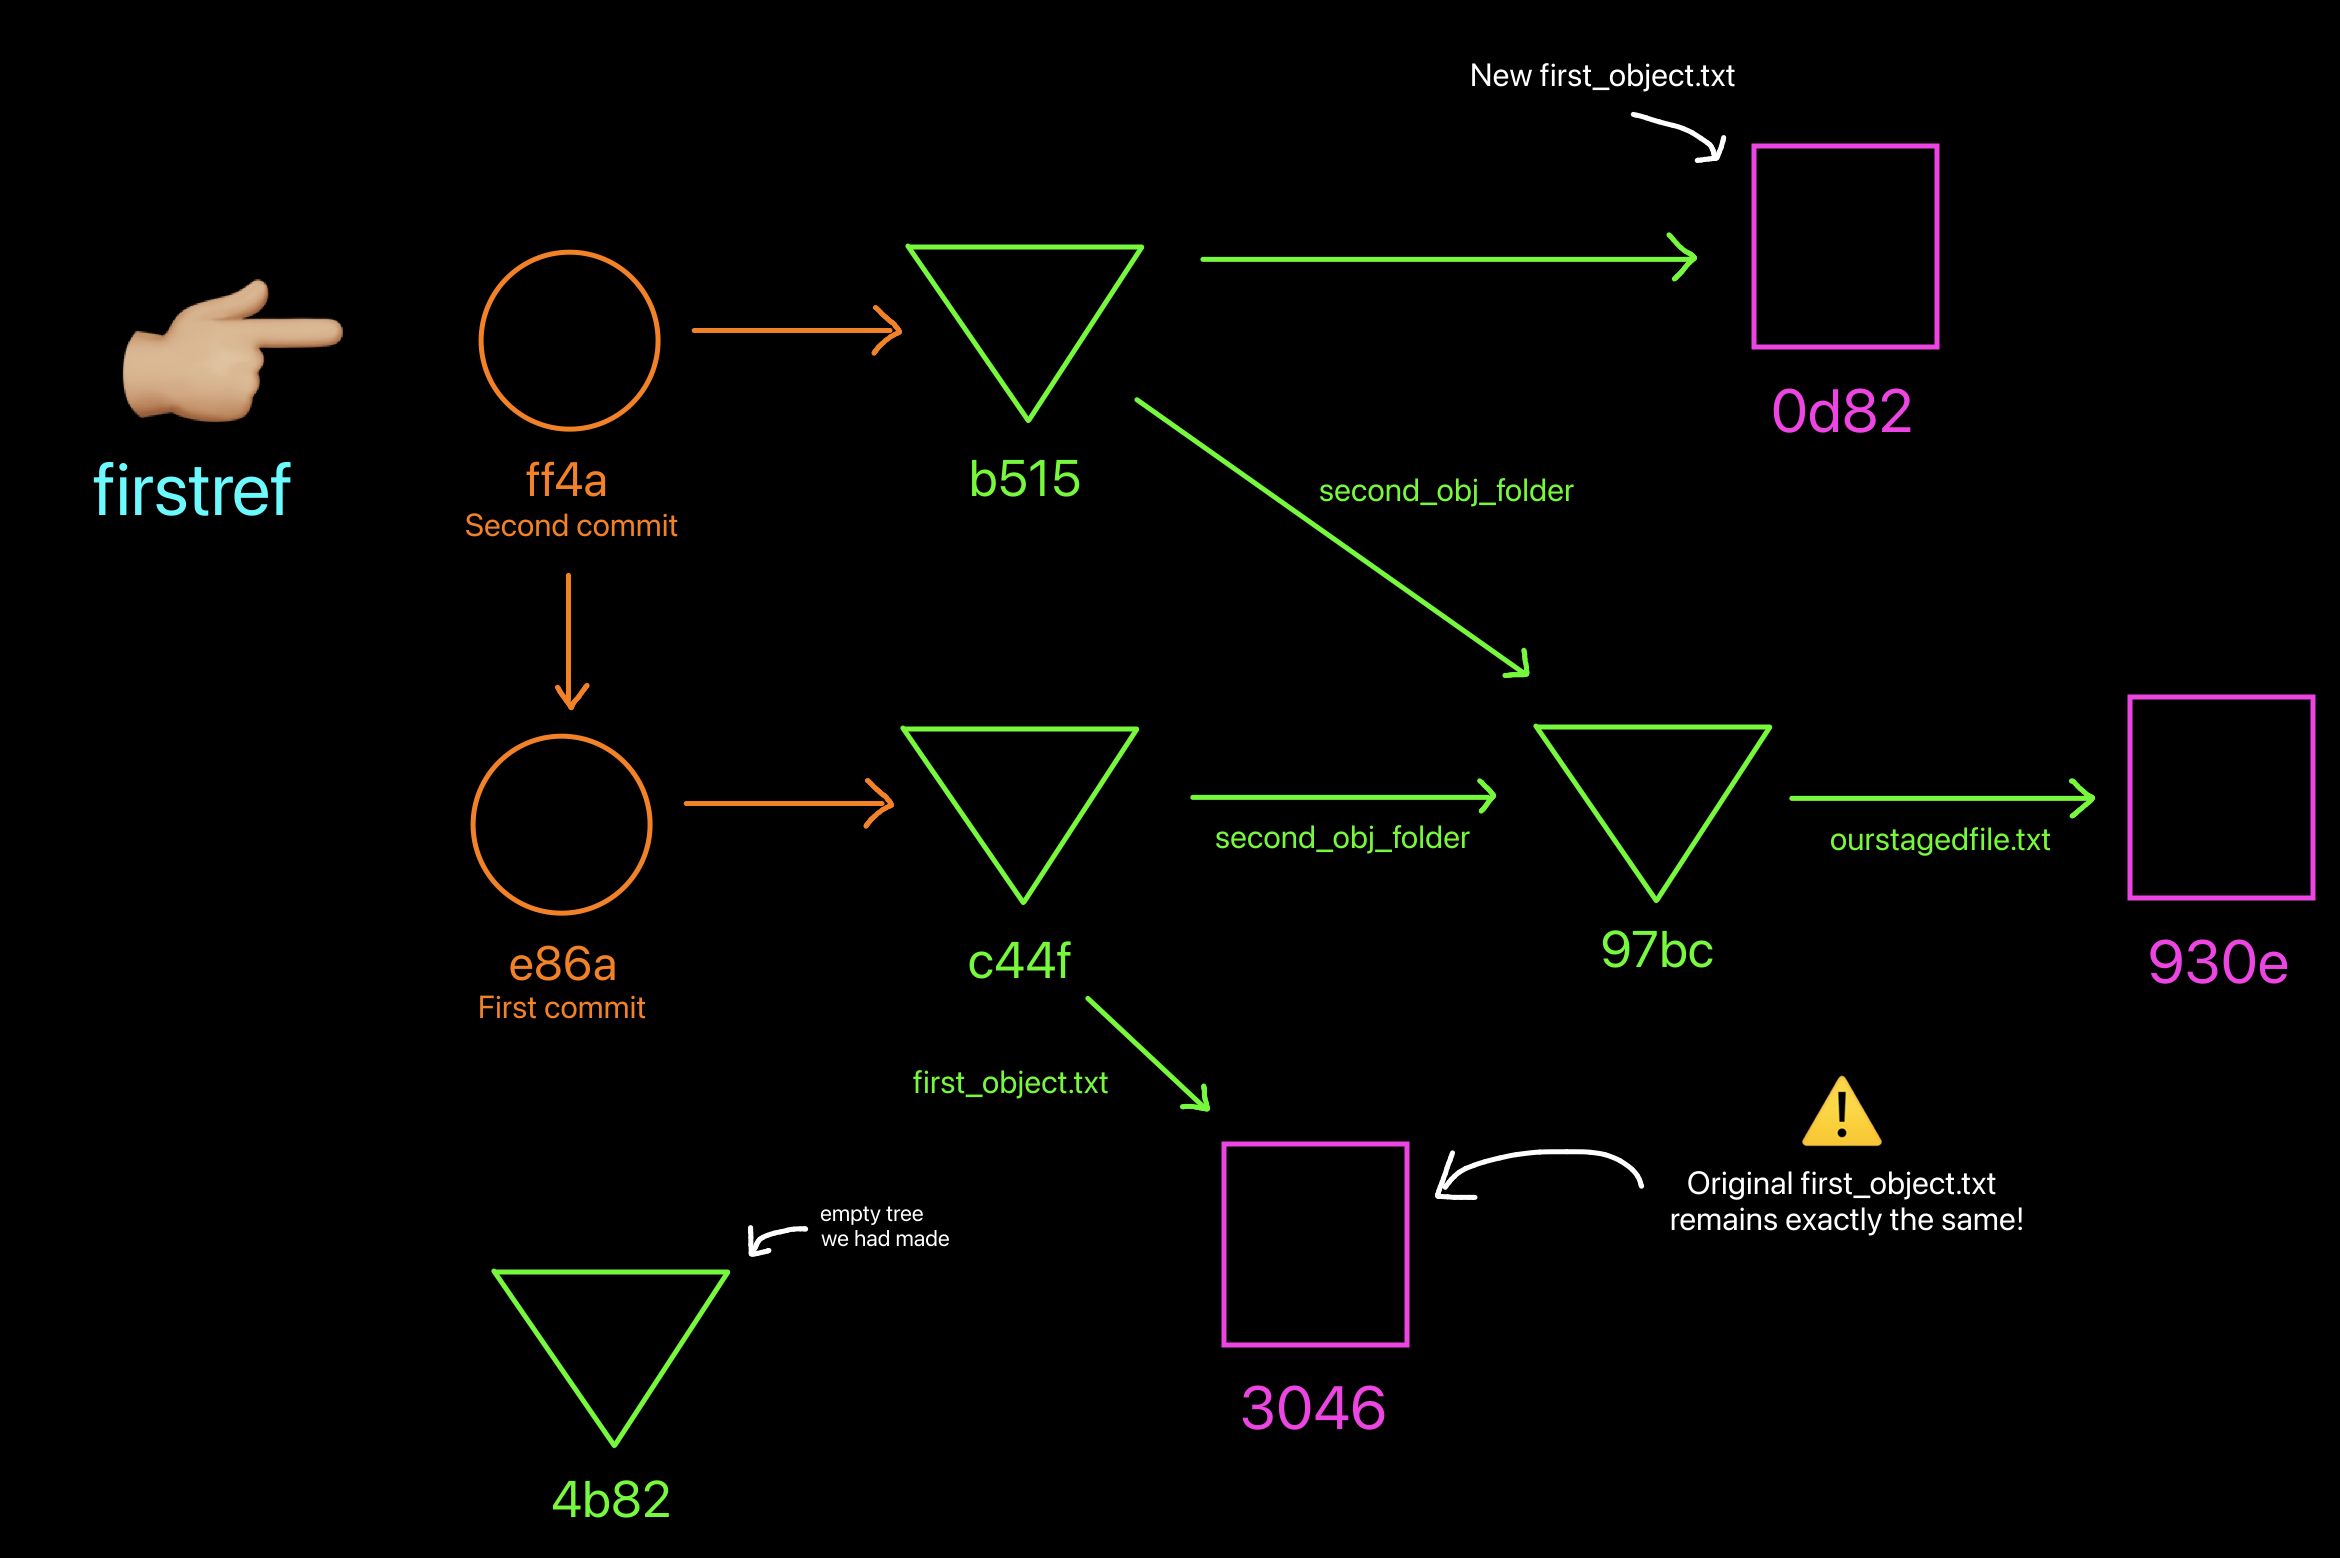
How our object database looks like right now. Notice the new ref added and it's pointing to commit ff4a.
What's so special about that ref? The answer is that when I now want
to refer to commit ff4a, most of the times I can get away with just
saying firstref!
The command git show <object> shows me a more detailed version of an
object, and for commits specifically, it automatically calculates the
changes between it and its parent. Below you can see its output:
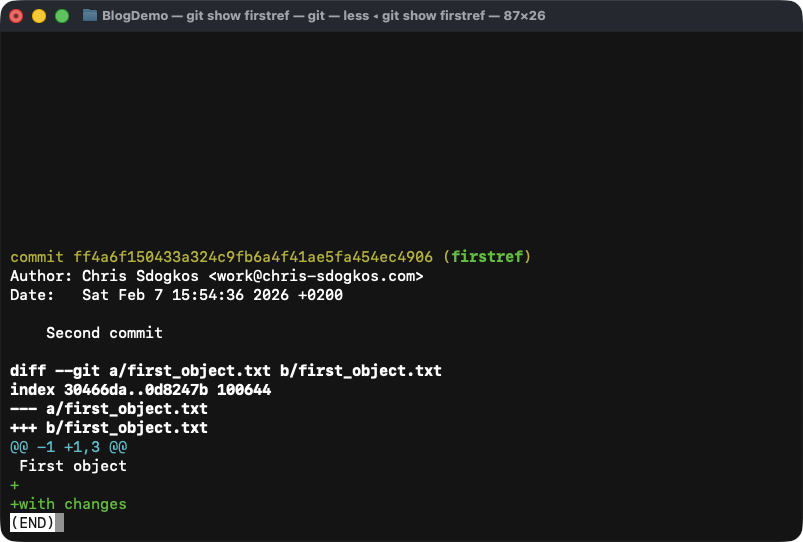
Output of 'git show firstref' shows us details about our commit ff4a.
Of course, you can get multiple refs to point to a single commit. It does not matter if one ref is already pointing to a commit.
There is one specific ref which indicates where we are currently
located, called HEAD. It is a special ref and we get to talk about it in
the next section.
Special/Symbolic refs
As previously mentioned, there is a special ref called HEAD. You can
find it in the root of .git/, more specifically in .git/HEAD. Let's
peek at its contents to figure out why it's called a "special" ref:
HEAD is the cornerstone of every command we execute. When you start
using porcelain commands like git commit, HEAD is going to play a huge
role in what that git subcommand does.
The reason it's called a special ref is because it can also point to other
refs. In this case, our HEAD is pointing to refs/heads/master.
refs/heads/master (or master for short) is not pointing anywhere,
therefore we are effectively pointing nowhere.
If we move master to point to our "Second commit", we will be
effectively getting HEAD to point to it as well. Imagine in this case,
HEAD is us and master is our horse. If master decides to move
somewhere else, HEAD follows along where master goes.
For demonstration purposes, let's move master:
Now if we type git show HEAD, we can see that we get the same commit
again, but notice the following:
Along with our commit object ID, we also get to see a set of all the normal and symbolic refs that this commit has on its back.
HEAD can also be symbolized with @, so git show @ means exactly the
same thing. For even more brevity, by typing git show, git assumes that
we are implying HEAD to be the ref we would like to use.
Now is a great time to introduce git log. If git show shows
information about a commit, git log acts the same way for commits with
the only difference being that it also traverses the history of all the
parent commits.
If we try it out here is what we see:
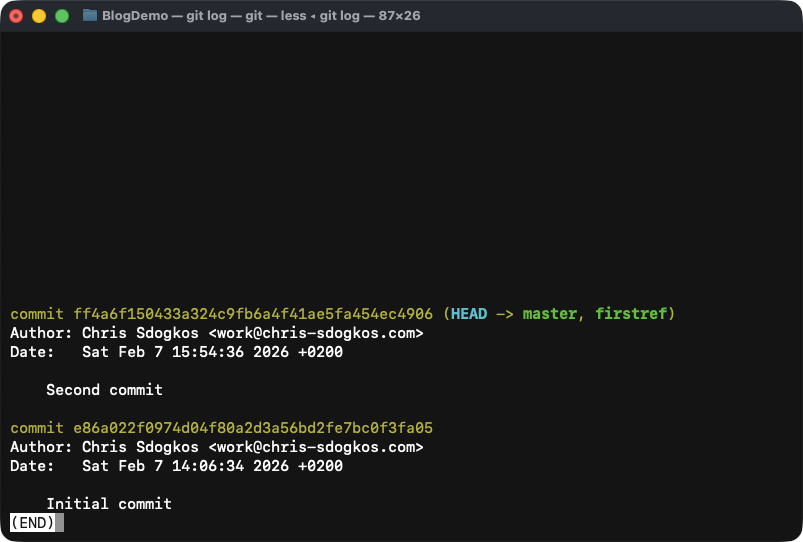
Output of 'git log'. Notice how we get to see information about the commit that 'HEAD' is pointing to as well as all its parent commits.
Moving HEAD
We have learned that HEAD is a symbolic ref because it can point to
either a commit object but also another ref. We also covered how to
update normal refs like refs/heads/master.
But how do we move HEAD?
Git has a plumbing command reserved for just updating and reading from
symbolic refs. It is called git symbolic-ref. By passing it just a
symbolic ref as an argument, you get the place it's pointing to:
If you pass a second argument in git symbolic-ref, it is implied that
you are trying to update where the ref is pointing to. The second
argument has to take the form of another ref's name. It can not be a
commit object ID. For that you have to use git update-ref:
In order to understand why --no-deref is passed, you can read the
following excerpt from the man page GIT-UPDATE-REF(1):
If --no-deref is given, <ref> itself is overwritten, rather than the result of following the symbolic pointers.
What to do next
Play around! Experiment and read. I really recommend git-scm. This is where you are going to learn a lot of concepts and where I personally learned most. But really, the more you type in the terminal and try to figure things out, it will make more and more sense. It just needs time and discipline.
Conclusion
Congratulations. You have learned about most of the git internals. Sure thing, one can argue that there are more concepts to be learned, however the ones mentioned above are the most fundamental ones. Without them, you will not understand the rest.
In Part II of this series, we will connect this knowledge with commands used in real life in actual production environments, discuss about branching out, rebasing, how pushing and fetching objects works with remotes, and finally a few tips and tricks and I like to give to people who are interested in improving their git best practices.
Thank you
To Zhanar, my partner, for the drawings in this post.
To Ethan, Hayden, Suraj, Surya Tejess, for providing me valuable feedback.